• To get started, ensure that you have a Lightsail server and have installed the Plesk control panel on it.
• To proceed, you'll need to install Java on your server. This can be accomplished by executing the following command:
sudo apt update
sudo apt install openjdk-11-jre-headless
• If you're using Linux as your operating system, you'll need to download the Elasticsearch package. This can be achieved by executing the command below:
cd // && sudo wget https://artifacts.elastic.co/downloads/elasticsearch/elasticsearch-7.12.0-linux-x86_64.tar.gz
• The next step is to extract the package by executing the command below:
sudo tar -xzf elasticsearch-7.12.0-linux-x86_64.tar.gz
&& sudo sudo mv elasticsearch-7.12.0 /usr/share/elasticsearch
• Carry out of configuring Elasticsearch by editing the `elasticsearch.yml` file in the `/usr/share/elasticsearch/config/` directory. You can use a text editor such as nano or vim to edit the file. Some recommended configurations to start with include:
cluster.name: flagtick-application
node.name: flagtick-node-1
network.host: 0.0.0.0
http.port: 9200
Note: These configurations set a unique name for your Elasticsearch cluster, give your Elasticsearch node a unique name, allow Elasticsearch to bind to all network interfaces, and set the HTTP port to 9200.
• To proceed further, create a new system user for Elasticsearch to run as by executing the following command:
sudo useradd elasticsearch
Note: Because of running command `sudo /usr/local/elasticsearch/bin/elasticsearch -d` encounter error as below:
java.lang.RuntimeException: can not run elasticsearch as root
Hence, you must create user named `elasticsearch` instead of using `root`. In particularly, the command above aims at establish access `/usr/share/elasticsearch` and trigger launching elasticsearch server.
sudo useradd elasticsearch -d /usr/share/elasticsearch/
• Next, change the ownership of the Elasticsearch files to the newly created user by executing the following command:
sudo chown -R elasticsearch:elasticsearch /usr/share/elasticsearch
Switch to elasticsearch and start elasticsearch in Lightsail server
sudo su elasticsearch
/usr/share/elasticsearch/bin/elasticsearch -d
• Once you have launched successfully, the error message sometimes appears as below:
ERROR: [2] bootstrap checks failed. You must address the points described in the following [2] lines before starting Elasticsearch.
Hence, we will follow up step-by-step to fix asap.
1. Increase the value of `vm.max_map_count` by running the following command as root:
sudo sysctl -w vm.max_map_count=262144
2. Edit the Elasticsearch configuration file (/etc/elasticsearch/elasticsearch.yml) and uncomment (#) the appropriate discovery settings. For example, you can add the following lines to the end of the file:
# ======================== Elasticsearch Configuration =========================
#
# NOTE: Elasticsearch comes with reasonable defaults for most settings.
#       Before you set out to tweak and tune the configuration, make sure you
#       understand what are you trying to accomplish and the consequences.
#
# The primary way of configuring a node is via this file. This template lists
# the most important settings you may want to configure for a production cluster.
#
# Please consult the documentation for further information on configuration options:
# https://www.elastic.co/guide/en/elasticsearch/reference/index.html
#
# ---------------------------------- Cluster -----------------------------------
#
# Use a descriptive name for your cluster:
#
# cluster.name: flagtick-application
#
# ------------------------------------ Node ------------------------------------
#
# Use a descriptive name for the node:
#
# node.name: flagtick-node-1
#
# Add custom attributes to the node:
#
# node.attr.rack: r1
#
# ----------------------------------- Paths ------------------------------------
#
# Path to directory where to store the data (separate multiple locations by comma):
#
# path.data: /path/to/data
#
# Path to log files:
#
# path.logs: /path/to/logs
#
# ----------------------------------- Memory -----------------------------------
#
# Lock the memory on startup:
#
# bootstrap.memory_lock: true
#
# Make sure that the heap size is set to about half the memory available
# on the system and that the owner of the process is allowed to use this
# limit.
#
# Elasticsearch performs poorly when the system is swapping the memory.
#
# ---------------------------------- Network -----------------------------------
#
# By default Elasticsearch is only accessible on localhost. Set a different
# address here to expose this node on the network:
#
network.host: 127.0.0.1
#
# By default Elasticsearch listens for HTTP traffic on the first free port it
# finds starting at 9200. Set a specific HTTP port here:
#
http.port: 9200
#
# For more information, consult the network module documentation.
#
# --------------------------------- Discovery ----------------------------------
#
# Pass an initial list of hosts to perform discovery when this node is started:
# The default list of hosts is ["127.0.0.1", "[::1]"]
#
discovery.seed_hosts: ["127.0.0.1", "[::1]"]
#
# Bootstrap the cluster using an initial set of master-eligible nodes:
#
cluster.initial_master_nodes: ["boring-swanson.13-227-25-164.plesk.page"]
#
# For more information, consult the discovery and cluster formation module documentation.
#
# ---------------------------------- Various -----------------------------------
#
# Require explicit names when deleting indices:
#
#action.destructive_requires_name: true

# Allow HTTP API connections from anywhere
# Connections are encrypted and require user authentication
http.host: 0.0.0.0
Note: Using `hostname` command to check name of cluster.initial_master_nodes to update. For example: My computer is boring-swanson.13-227-25-164.plesk.page.
After that, you can use `curl http://127.0.0.1:9200` to see how elasticsearch ready on Lightsail server.
{
  "name" : "boring-swanson.13-227-25-164.plesk.page",
  "cluster_name" : "elasticsearch",
  "cluster_uuid" : "YO5VGmTzRhmGa1Zs5deNdg",
  "version" : {
    "number" : "7.12.0",
    "build_flavor" : "default",
    "build_type" : "tar",
    "build_hash" : "78722783c38caa25a70982b5b042074cde5d3b3a",
    "build_date" : "2021-03-18T06:17:15.410153305Z",
    "build_snapshot" : false,
    "lucene_version" : "8.8.0",
    "minimum_wire_compatibility_version" : "6.8.0",
    "minimum_index_compatibility_version" : "6.0.0-beta1"
  },
  "tagline" : "You Know, for Search"
}
• Getting start Elasticsearch as a systemd service, you can create `elasticsearch.service` file in the `/etc/systemd/system/` directory with the following content:
[Unit]
Description=Elasticsearch

[Service]
ExecStart=/usr/share/elasticsearch/bin/elasticsearch
Restart=always
User=elasticsearch
Group=elasticsearch
Environment=JAVA_HOME=/usr/lib/jvm/java-11-openjdk-amd64

[Install]
WantedBy=multi-user.target
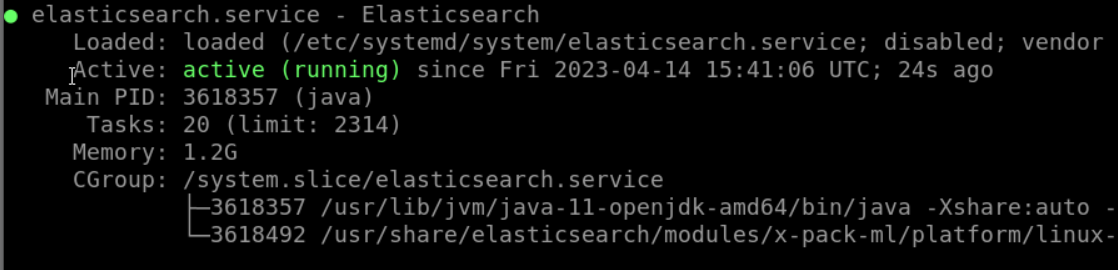
Then, you can start and check status the service by running:
sudo systemctl start elasticsearch.service
sudo systemctl status elasticsearch.service
or
sudo service elasticsearch start
sudo service elasticsearch status
You can observe batchmode as below:
• Check if the firewall allows incoming traffic: If you are still unable to access Elasticsearch from outside the instance, check if the firewall on the Lightsail instance is blocking incoming traffic on port 9200.
sudo ufw enable
sudo ufw allow 9200/tcp or sudo ufw allow 9200
sudo ufw reload && sudo ufw status
• Configure the firewall to allow access to the default Elasticsearch HTTP API port (TCP 9200) for the trusted remote host
udo ufw allow from <Your IP of Instance> to any port 9200
• Once that is complete, you can enable and check status UFW with the command:
sudo ufw enable && sudo ufw status
Running the command `sudo netstat -tuln | grep 9200` will show you if any process is listening on port 9200.
p6 0 0 127.0.0.1:9200 :::* LISTEN
Note: In this case, Elasticsearch is running and listening on IPv6 TCP protocol on port 9200.
• Monitor the health of an Elasticsearch cluster
curl -XGET http://localhost:9200/_cluster/health?pretty=true
Note: If you encounter error `503 Service Unavailable`. You need to fix it asap. In typical, we will run the following command to get further information.
curl -XGET http://127.0.0.1:9200/_cat/master?v
Hence, you need to carry out of establish master node and looks for the cluster.initial_master_nodes setting in the `elasticsearch.yml` file.