Are you tired of manually creating Jira issues? Look no further than WPForms and Jira integration! In this post, we'll walk you through the process of effortlessly creating Jira issues, streamlining your project management process, and enhancing team collaboration.
Here, is what we will cover:
- Setting up Jira Account for REST APIs
- Manipulate With Curl Command
- Create Custom Form By Using WPForms
- Implementing Functions in WordPress
- Conclusion
I. Setting up Jira Account for REST APIs
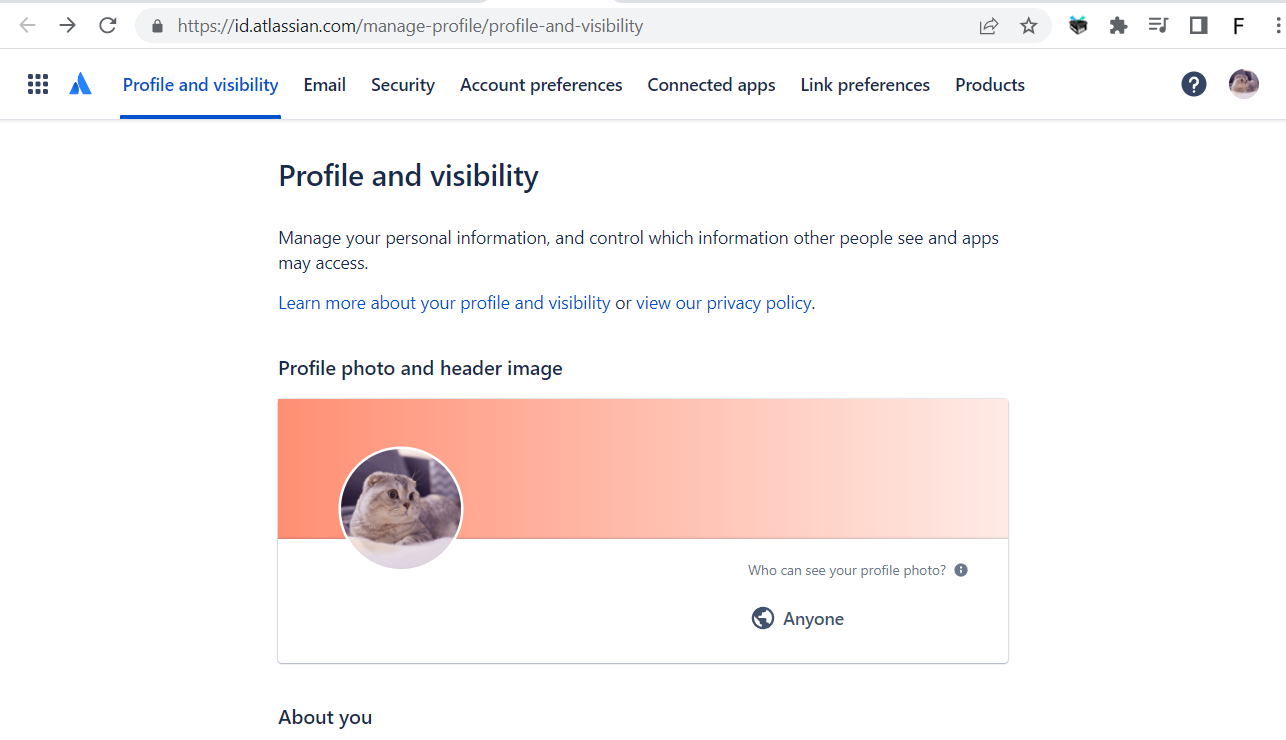
If you don't already have a Jira account, you can sign up for one at https://id.atlassian.com/signup. Once you have already created and verified successfully, we can go to the screen that allows you to manage your Atlassian account profile and visibility settings.
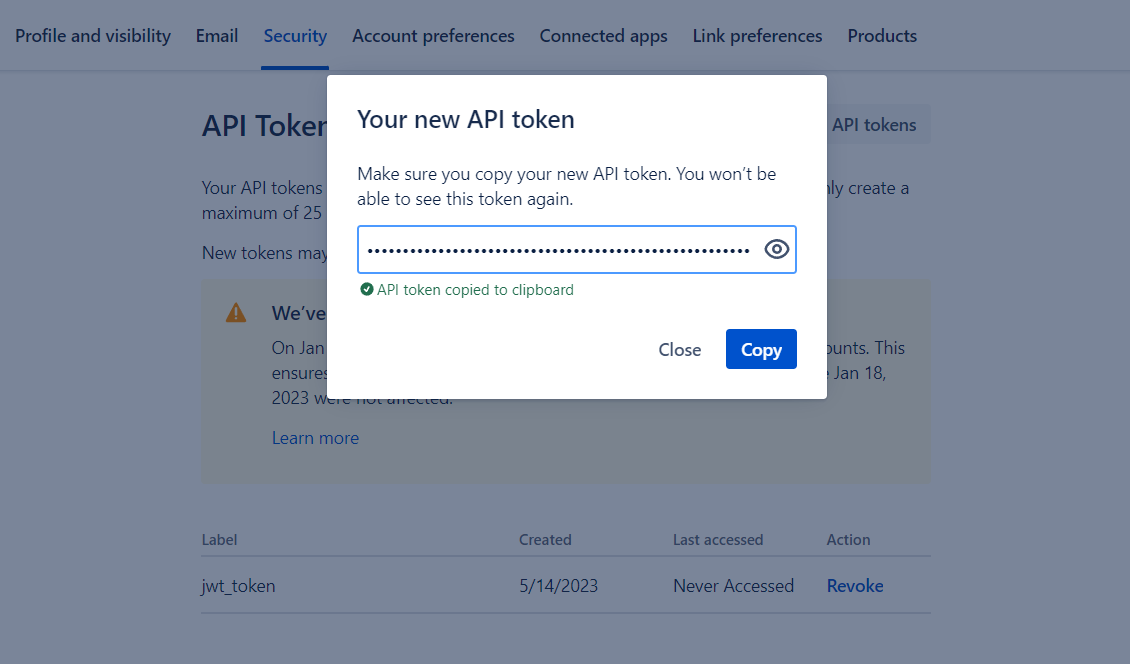
Right here, you need to create an API token to use the REST APIs. Hence, navigate to Security » Create and manage API tokens.
One of the features of Jira Work Management is the ability to create and manage onboarding processes for new hires. Thus, we will create a new project based on option New employee onboarding.
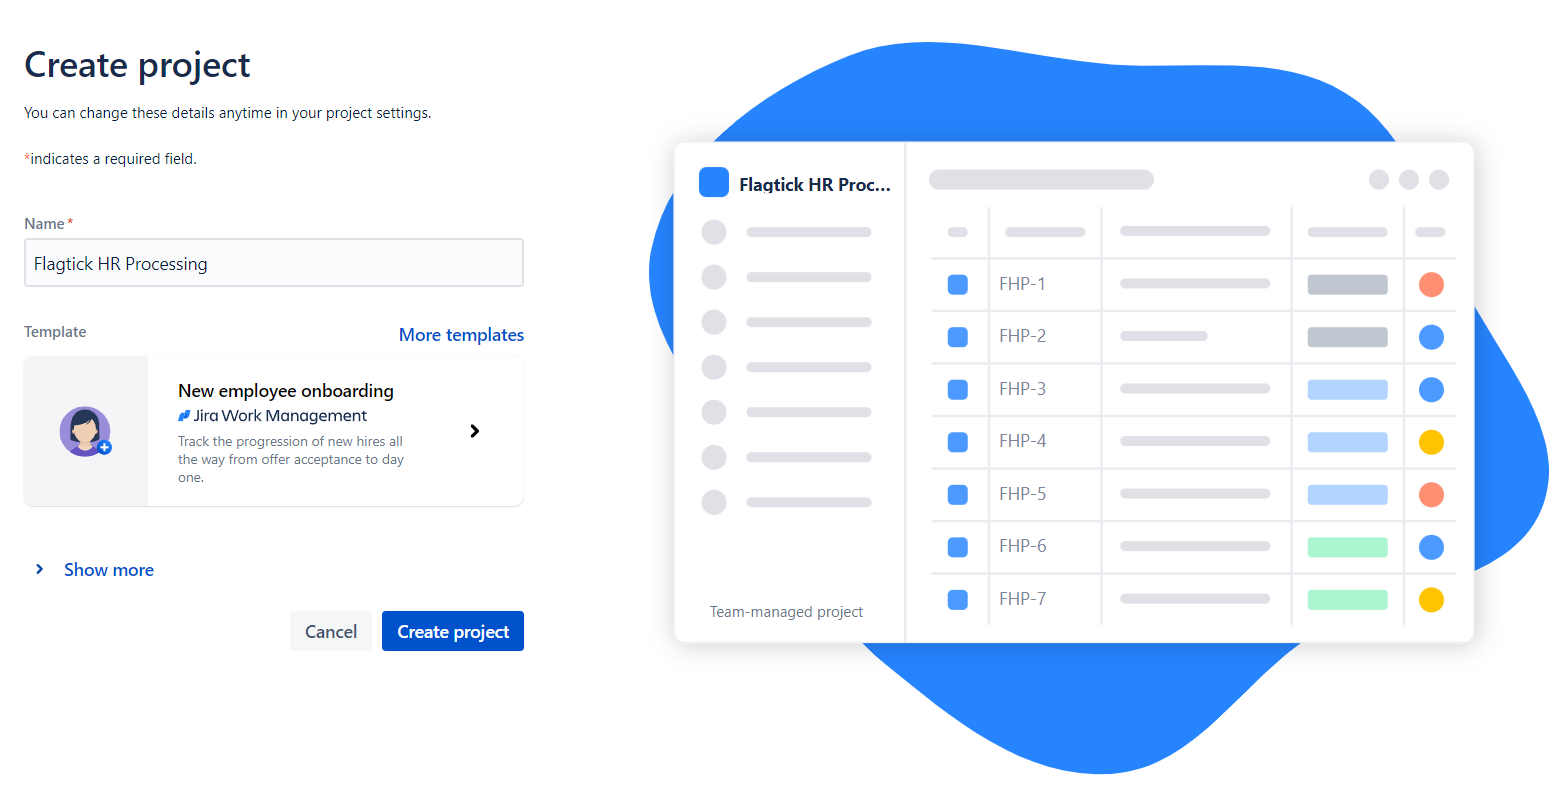
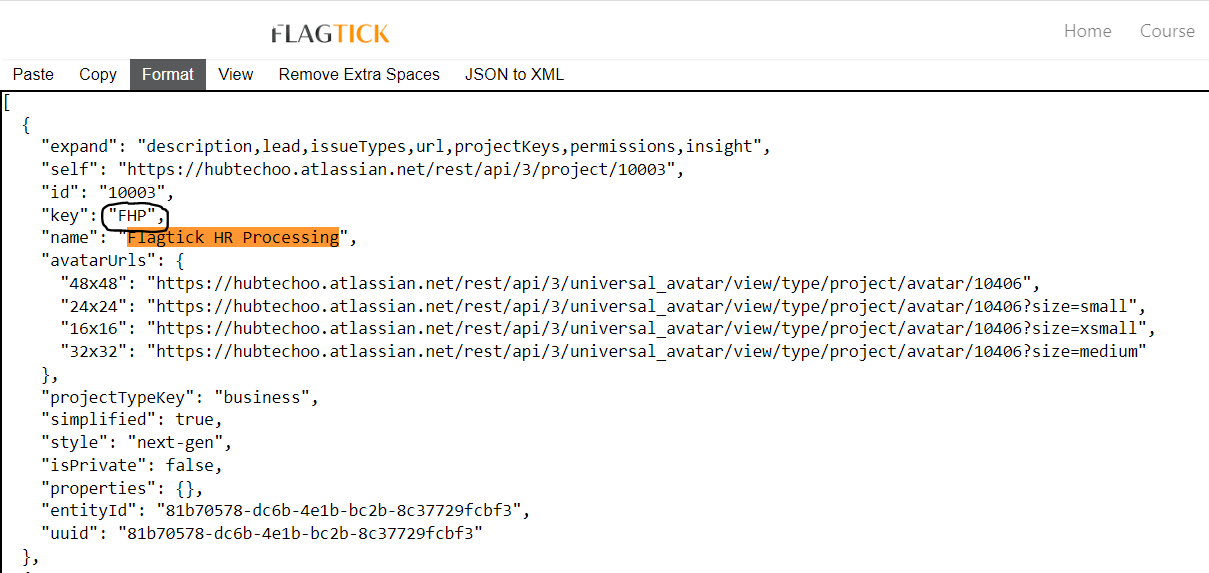
Click Show more, we will get further information for the Jira project such as project key, project type, ...
project key: FHP
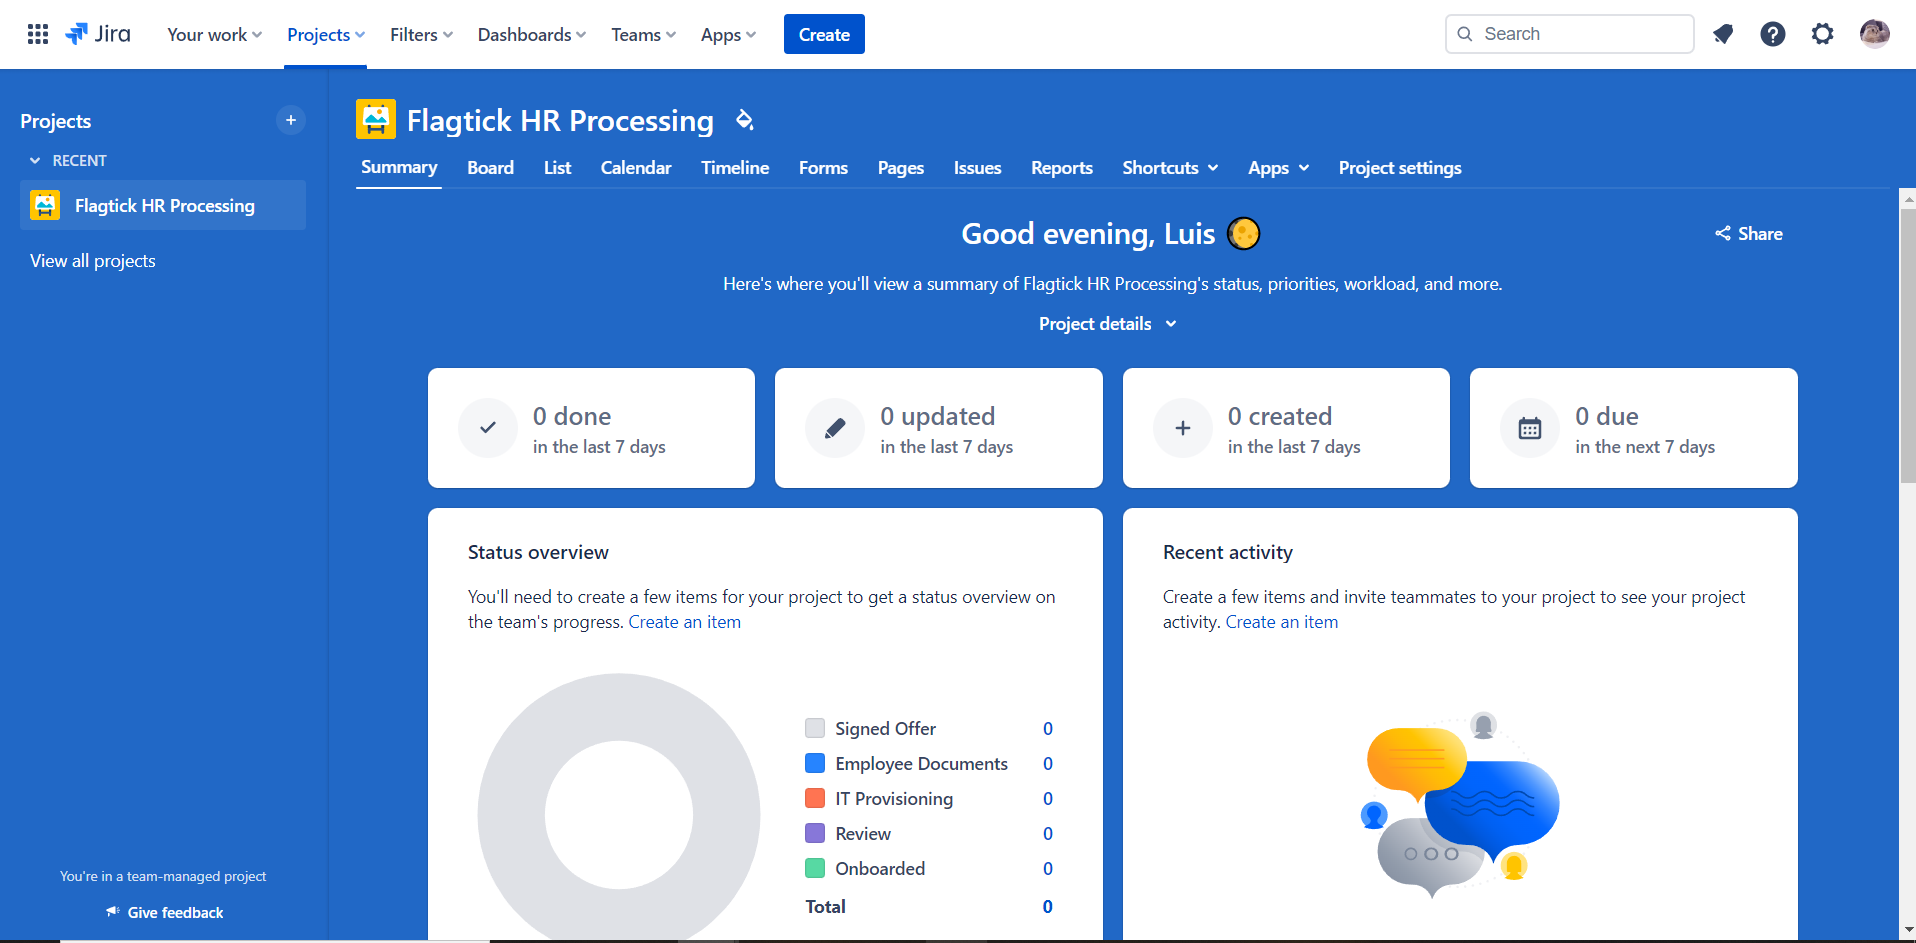
Let move to open the summary page of the "FHP" which stands for Flagtick HR Processing project in Jira.
If you go to https://developer.atlassian.com/cloud/jira/platform/rest/v3/api-group-issues/#api-group-issues, you will be taken to the Atlassian Developer documentation page that pertains to the Jira REST API version 3.
II. Manipulate With Curl Command
Use the curl command to make HTTP requests to the Atlassian Jira REST API, and test the API endpoints before implementing them in your application using specific programming language. There are some common commands that can be summarized as follows:
» Get Project Key
curl --request GET \
  --url 'https://hubtechoo.atlassian.net/rest/api/2/project' \
  --user '[email protected]:ATATT3xFfGF01rT1h9OGuADYdIIholGXj6OB5LLFEPv2xFmQKR36L8SGvsn074zWvbQ_RsSbAS2Pbrjv9fb2HYk1tWX5sf-sVMVmbBe3V7azsgtjBlGU39F1a7F7l8PuloApd4_lLXVMBPpyNj4n5BI6BYp1shC8jxEtkHG9M1i8KD_EYNoLwzk=75B25C43' \
  --header 'Accept: application/json'
You can format the JSON response by copying the command output and pasting it into JSON formatter, such as the one available at https://flagtick.com/viewjson.
» Get Issue Type
curl --request GET \
  --url 'https://hubtechoo.atlassian.net/rest/api/2/project/FHP/statuses' \
  --user '[email protected]:ATATT3xFfGF01rT1h9OGuADYdIIholGXj6OB5LLFEPv2xFmQKR36L8SGvsn074zWvbQ_RsSbAS2Pbrjv9fb2HYk1tWX5sf-sVMVmbBe3V7azsgtjBlGU39F1a7F7l8PuloApd4_lLXVMBPpyNj4n5BI6BYp1shC8jxEtkHG9M1i8KD_EYNoLwzk=75B25C43' \
  --header 'Accept: application/json'
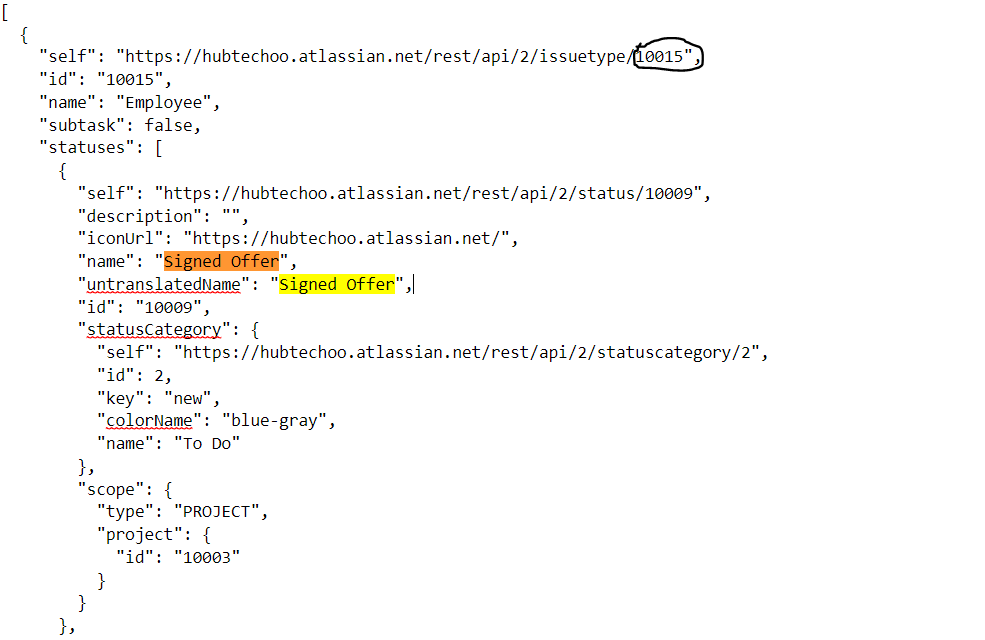
Let go to Kanban board for the FHP project in Jira Software and compare with response from the curl command. We will extract value for issue_type parameter.
» Upload sample data to Jira
curl --request POST \
  --url 'https://hubtechoo.atlassian.net/rest/api/2/issue' \
  --user '[email protected]:ATATT3xFfGF01rT1h9OGuADYdIIholGXj6OB5LLFEPv2xFmQKR36L8SGvsn074zWvbQ_RsSbAS2Pbrjv9fb2HYk1tWX5sf-sVMVmbBe3V7azsgtjBlGU39F1a7F7l8PuloApd4_lLXVMBPpyNj4n5BI6BYp1shC8jxEtkHG9M1i8KD_EYNoLwzk=75B25C43' \
  --header 'Accept: application/json' \
  --header 'Content-Type: application/json' \
  --data '{
    "fields": {
      "description": "",
      "duedate": "2023-07-11",
      "issuetype": {
        "id": "<Issue ID>"
      },
      "customfield_xxxxx": "test",
      "customfield_xxxxx": "",
      "project": {
        "id": "<Project ID>"
      },
      "summary": "Sample Text"
    }
}'
» Custom Fields
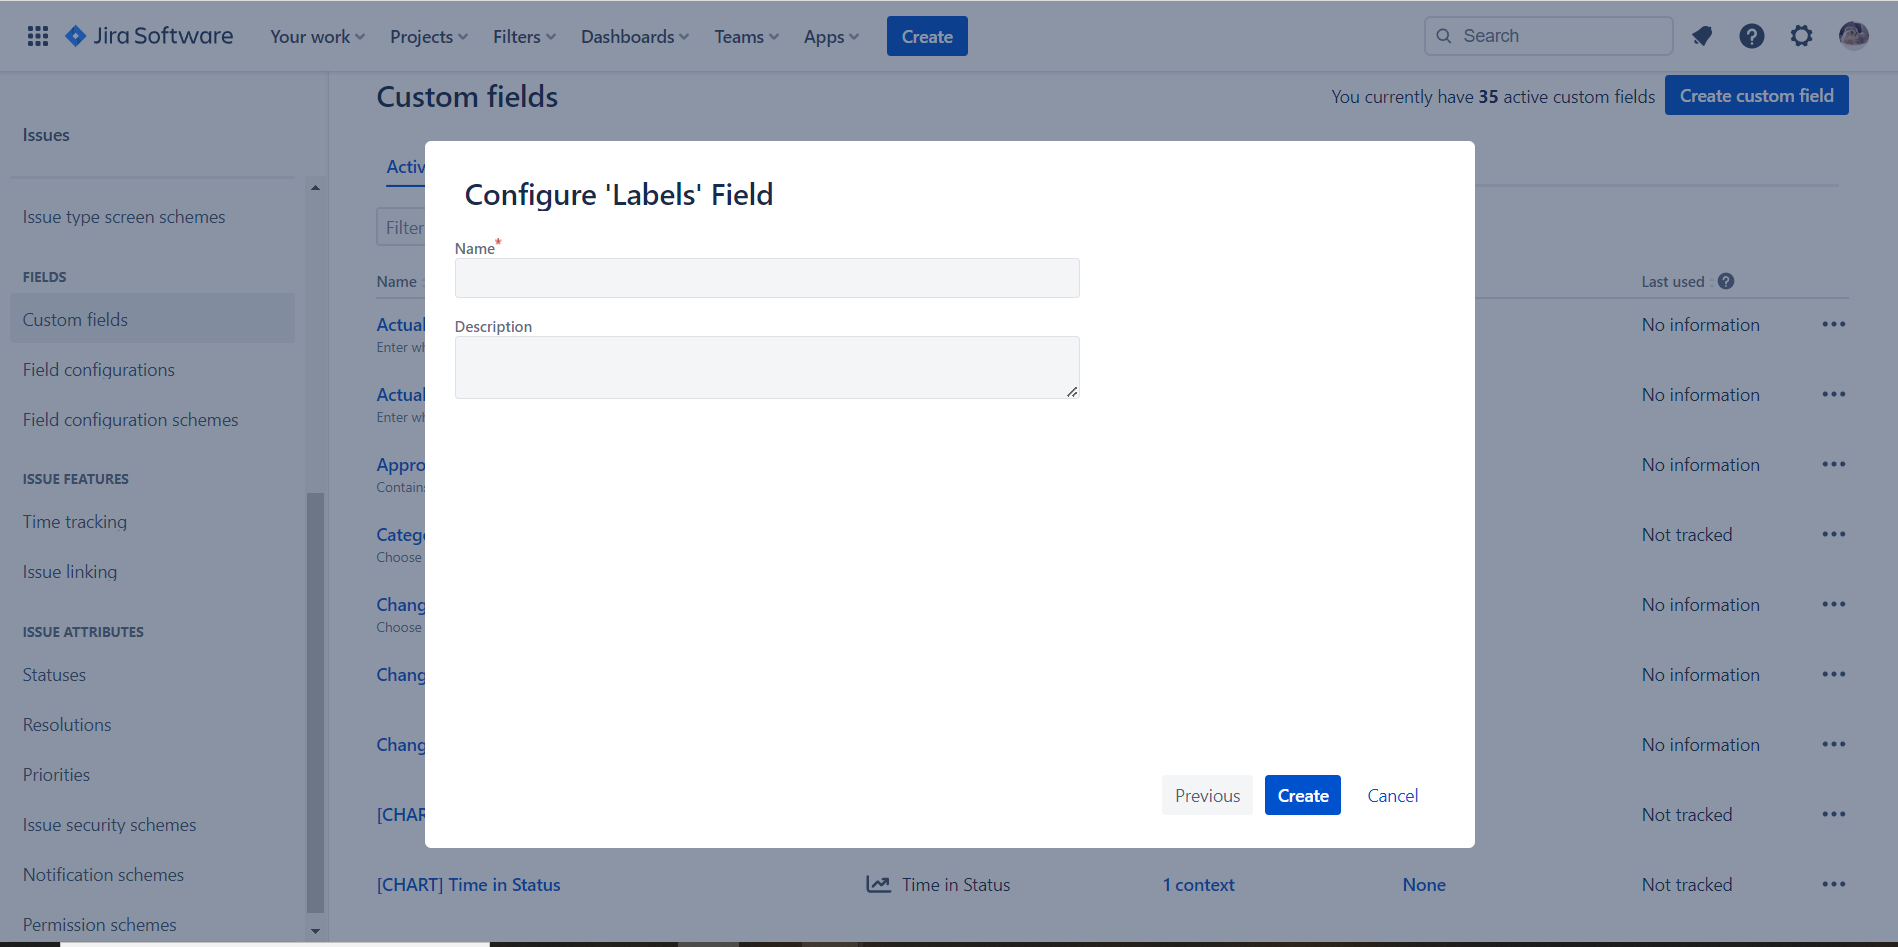
In some cases, you will need the appropriate permissions in Jira to create and manage custom fields. Additionally, adding custom fields to a project may require changes to Jira workflows and other settings, so it's important to carefully review any impacts before making changes.
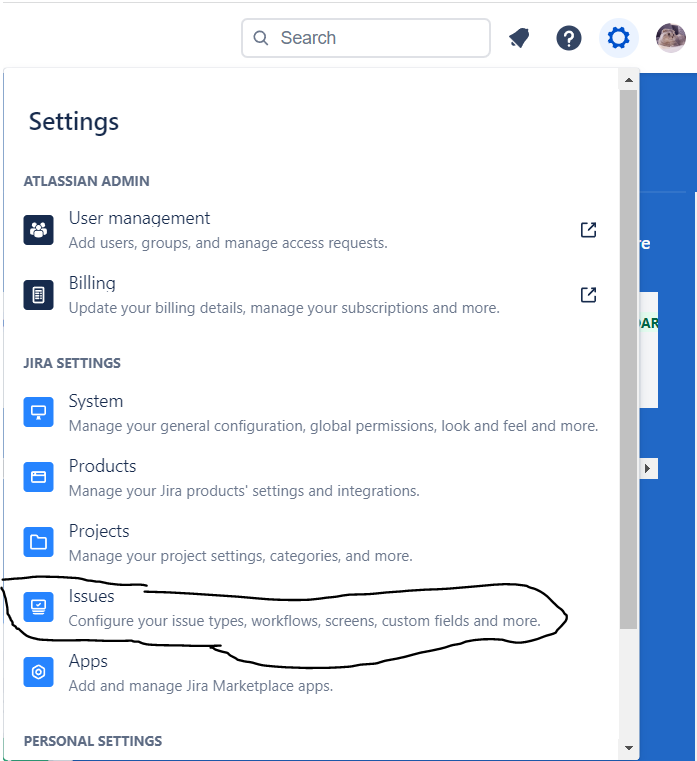
Visit Jira administration screen for custom fields, all custom fields that have been defined for the Jira instance, including their names, descriptions, types, and other properties. Hence, you can totally manage by creating new fields, editing existing fields and deleting fields that are no longer needed.
III. Create Custom Form By Using WPForms
First and foremost, you need to set up a new WordPress website or use an existing one that is available on your local machine, and ensure that it supports the integration of WPForms with WordPress so that you can submit data to your Jira dashboard.
To learn about WPForms pricing, visit their official website at https://wpforms.com/pricing. Note that the price of WPForms varies depending on the package you choose, and the level of support you receive may also depend on which features are enabled or disabled.

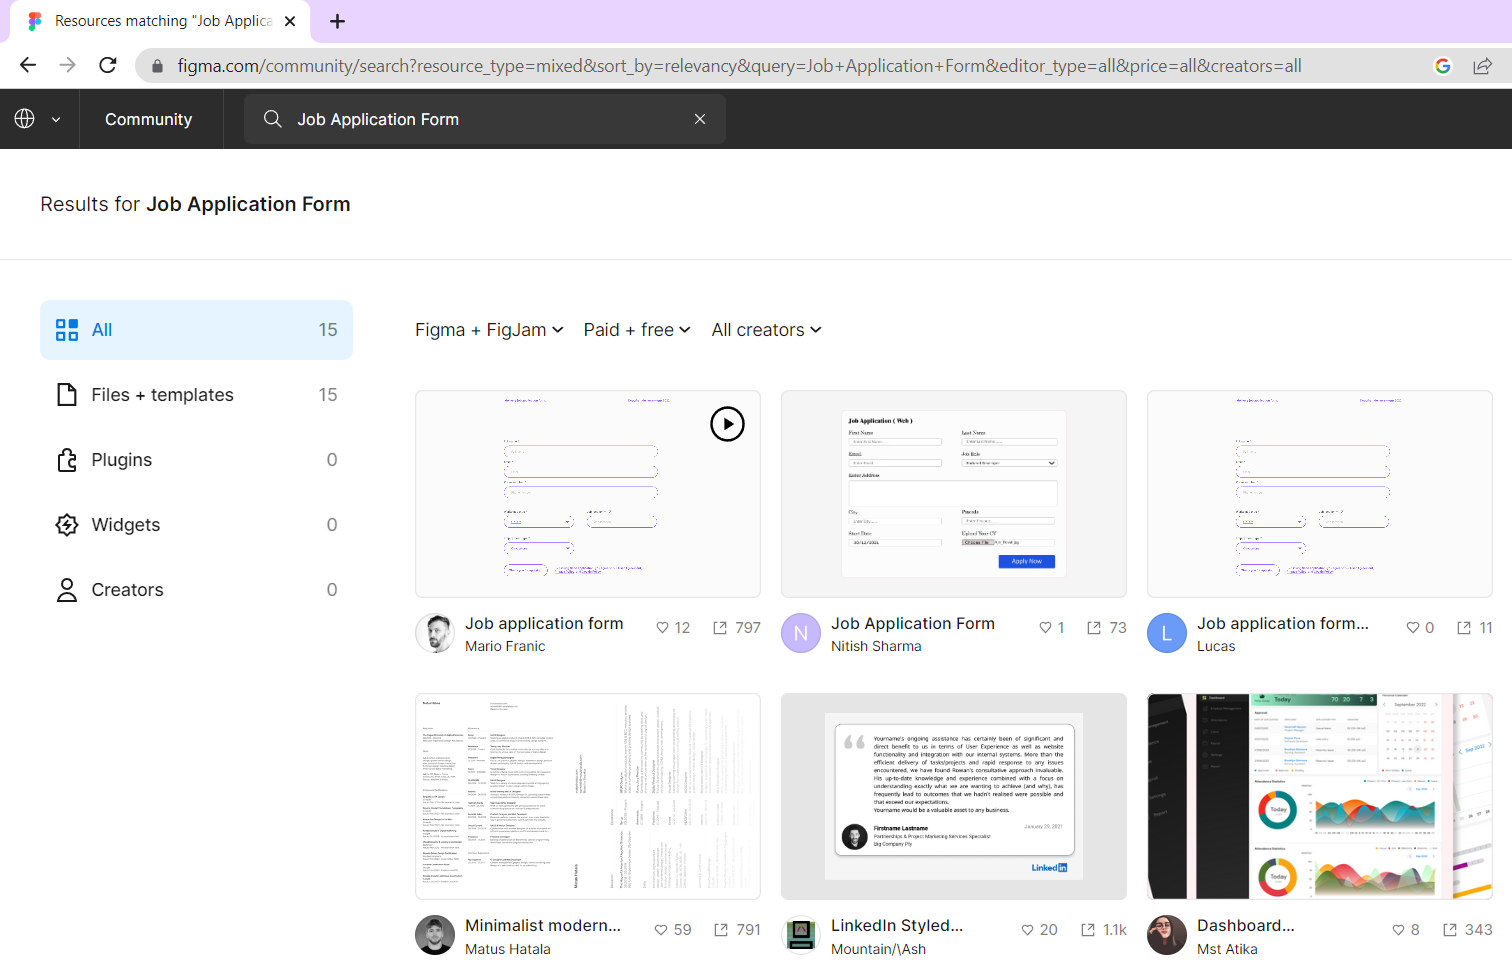
To receive the WPForms plugin, please leave a comment and register your email address. Once you've completed the registration, we'll send you the plugin via email. Take advantage of using the Figma community, use the keyword is Job Application Form to get search results page within the Figma community section, where the search results are filtered by the resource type.
For example, we assume that have design as below:
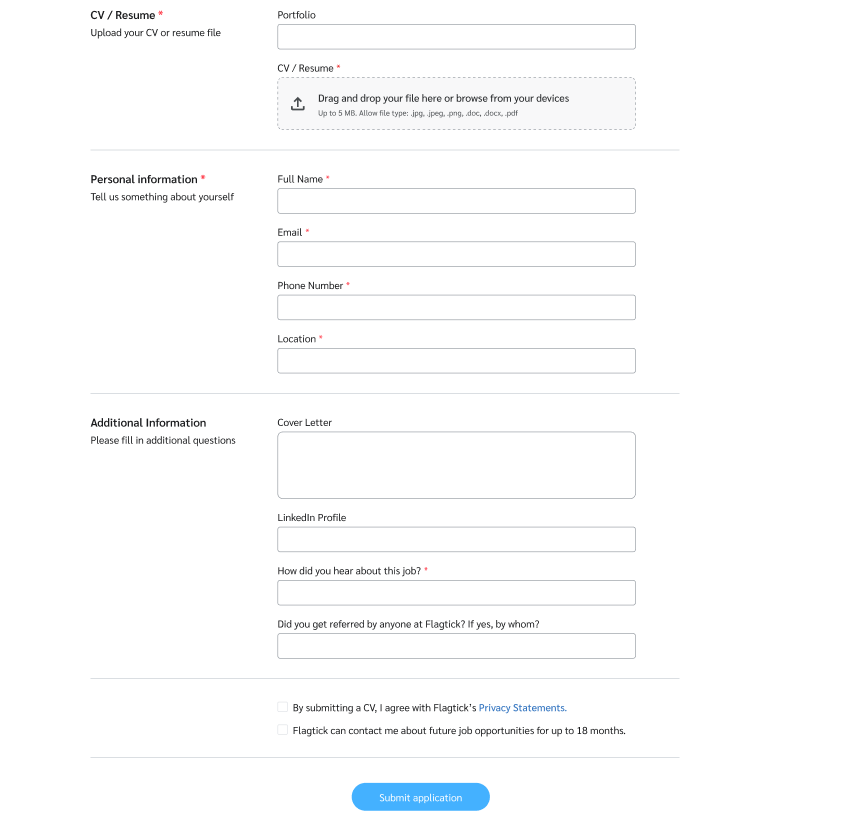
Here is how the form fields and layout are structured within the WPForms plugin.
wpform/
├── Layout
│   ├── HTML / Code Block
│   └── Single Line Text
|
│   ├── HTML / Code Block
│   └── File Upload
|   ...
├── HTML / Code Block
|   ...
├── Layout/
│   ├── HTML / Code Block
│   └── Single Line Text
|
│   ├── HTML / Code Block
│   └── Paragraph Text
└── ...
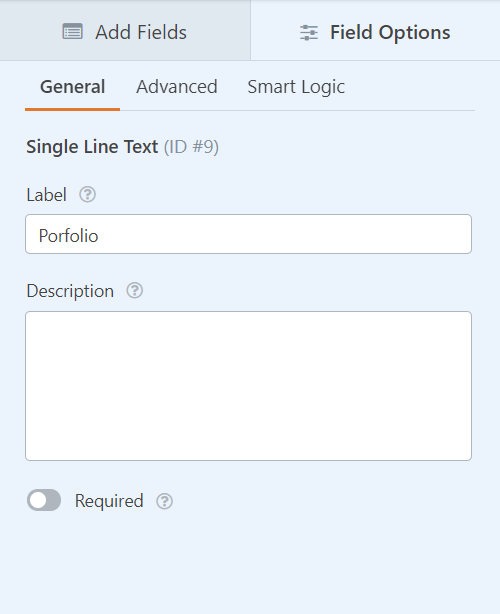
Note: Unique ID number is assigned to every field added to a form in WPForms, allowing for easy retrieval of the field's value through querying. For example:
$entry['fields']['9'];
IV. Implementing Functions in WordPress
First and foremost, we will use the wpforms_process_complete hook to retrieve all field data from WPForms when the user clicks the submit button.
function application_form( $fields, $entry, $form_data ) {

    $porfolio_in = $entry['fields']['9'];
    $fullname_in = $entry['fields']['16'];
    $email_in = $entry['fields']['41'];
    $phone_number_in = $entry['fields']['18'];

    // TODO
}


add_action( 'wpforms_process_complete', 'application_form', 10, 3 );
Next, we will proceed to define the title for the summary of the issue. Hence, let concatenate the string obtained from the data in WPForms with the value of the corresponding HTML tag.
$issuetype_id = "11512";
$sumary = get_job_category();
Now, let us take a look at the declaration of the get_job_category() function, which we defined in the script earlier.
function get_job_category() {
    $current_slug = get_post_field('post_name', get_post());
    $page = get_page_by_path($current_slug);
    $post_id = $page->ID;
    $content = get_post_field('post_content', $post_id, 'page');
    if (preg_match('/vc_custom_heading.*?text="(.*?)"/', $content, $matches)) {
        $vc_custom_heading = $matches[1];
        return $vc_custom_heading;
    }
    return '';
}
Here is sample code snippet that demonstrates how to use the preg_match function with the provided regular expression to extract the text from vc_custom_heading tag in a string:
$content = '<h2 class="vc_custom_heading" text="Sample Heading">This is a sample heading</h2>';

preg_match('/vc_custom_heading.*?text="(.*?)"/', $content, $matches);

if (isset($matches[1])) {
    $headingText = $matches[1];
    echo $headingText; // Value is Sample Heading
} else {
    echo "Heading text not found.";
}
To send the issue and its attached file to Jira Cloud, we will use cURL. This method enables us to transfer all the essential data and files to the relevant Jira endpoint, ensuring a successful submission.
// Convert the data array to a JSON string
$json_data = json_encode($data);

if (function_exists('curl_init')) {
	$url = 'https://fl-jira.atlassian.net/rest/api/2/issue';

	// Set up cURL
	$ch = curl_init();
	// Set the URL and other cURL options
	curl_setopt($ch, CURLOPT_URL, $url);
	curl_setopt($ch, CURLOPT_POST, 1);
	curl_setopt($ch, CURLOPT_USERPWD, '<username>:<api token>');
	curl_setopt($ch, CURLOPT_RETURNTRANSFER, 1);
	curl_setopt($ch, CURLOPT_HTTPHEADER, array('Content-Type: application/json', 'Accept: application/json'));
	curl_setopt($ch, CURLOPT_POSTFIELDS, $json_data);
	$response = curl_exec($ch);
	if (curl_errno($ch)) {
		$error_msg = curl_error($ch);
		error_log(json_encode($error_msg));
	} else {
		$pattern = '/(\d+)"/';
		if (preg_match($pattern, $response, $matches)) {
			$issue_id = $matches[1];
			$file_path = $fields[ '11' ][ 'value' ];
			$file_name = basename($file_path);
			upload_file_to_jira($issue_id, $file_path, $file_name);
		}
		wpforms()->form->update($form_data);
	}
	curl_close($ch);
} else {
	error_log('Curl is not enabled');
}
Then, we will observe the declaration of the upload_file_to_jira() function, which is used in above script.
function upload_file_to_jira($issue_key, $file_url, $file_name) {
    $file_path = WP_CONTENT_DIR . '/themes/<Your WordPress theme>/wpform/'.$file_name;

    if (!is_dir(dirname($file_path))) {
        mkdir(dirname($file_path), 0755, true);
    }
	// Download and save the file contents from the URL
    $file_contents = file_get_contents($file_url);
    $isUploaded = file_put_contents($file_path, $file_contents);

    // Download the file and save it to the assets directory
    if ($isUploaded) {
        $attach_file_temp = '/wpform/'.$file_name;
        if (file_exists(__DIR__ . $attach_file_temp)) {
            error_log("$attach_file_temp exists");
            $ch = curl_init();
            curl_setopt($ch, CURLOPT_URL, 'https://fl-jira.atlassian.net/rest/api/3/issue/' . $issue_key . '/attachments');
            curl_setopt($ch, CURLOPT_RETURNTRANSFER, 1);
            curl_setopt($ch, CURLOPT_POST, 1);
            curl_setopt($ch, CURLOPT_USERPWD, '<username>:<api_token>');
            curl_setopt($ch, CURLOPT_HTTPHEADER, array('X-Atlassian-Token: no-check'));
            curl_setopt($ch, CURLOPT_POSTFIELDS, array('file' => new CURLfile(__DIR__ . $attach_file_temp)));
            $result = curl_exec($ch);
            curl_close($ch);
            unlink(__DIR__ . '/' . $attach_file_temp);
        } else {
            error_log("$attach_file_temp does not exist");
        }
    } else {
        error_log('File save failed');
    }
}
In some cases, you're experiencing with file_get_contents() not working with an HTTPS URL, you can try using the curl extension instead.
function upload_file_to_jira($issue_key, $file_url, $file_name) {
    $file_path = WP_CONTENT_DIR . '/themes/<Your WordPress theme>/wpform/'.$file_name;

    if (!is_dir(dirname($file_path))) {
        mkdir(dirname($file_path), 0755, true);
    }

    // Download and save the file contents from the URL
    $curl = curl_init();
    curl_setopt($curl, CURLOPT_URL, $file_url);
    curl_setopt($curl, CURLOPT_RETURNTRANSFER, true);
    $file_contents = curl_exec($curl);
    $isUploaded = file_put_contents($file_path, $file_contents);

    // Download the file and save it to the assets directory
    if ($isUploaded) {
        $attach_file_temp = '/wpform/'.$file_name;

        if (file_exists(__DIR__ . $attach_file_temp)) {
            error_log("$attach_file_temp exists");
            $ch = curl_init();
            curl_setopt($ch, CURLOPT_URL, 'https://fl-jira.atlassian.net/rest/api/3/issue/' . $issue_key . '/attachments');
            curl_setopt($ch, CURLOPT_RETURNTRANSFER, 1);
            curl_setopt($ch, CURLOPT_POST, 1);
            curl_setopt($ch, CURLOPT_USERPWD, '<username>:<api token>');
            curl_setopt($ch, CURLOPT_HTTPHEADER, array('X-Atlassian-Token: no-check'));
            curl_setopt($ch, CURLOPT_POSTFIELDS, array('file' => new CURLfile(__DIR__ . $attach_file_temp)));
            $result = curl_exec($ch);
            curl_close($ch);
            unlink(__DIR__ . '/' . $attach_file_temp);
        } else {
            error_log("$attach_file_temp does not exist");
        }
    } else {
        error_log('File save failed');
    }
}
V. Conclusion
This article focuses on integrating WordPress and Jira to enhance issue tracking, streamline workflows, and promote collaboration within your team. By leveraging the user-friendly WPForms and the powerful Jira Cloud APIs, you can effortlessly integrate these platforms. Discover how this integration simplifies the process, improves efficiency, and facilitates seamless communication for your project management needs.
VI. Video