Before diving into the details of building and dockerizing full-stack Laravel Vue app, it is essential to grasp why Docker is the preferred choice for development environments over conventional solutions like XAMPP. This article explores the advantages and considerations that make Docker a powerful tool in modern application development.
I. Understanding Docker for Laravel Vue
When working on projects involving technologies like Laravel and Vue, XAMPP is often necessary. It enables the operation of localhost:3306 for the MySQL database, providing a seamless connection for Laravel applications through port 3306.
Let us check the status of Apache and MySQL without using the GUI, you can use curl to make HTTP requests to the respective local web servers.
curl --verbose http://localhost
*   Trying 127.0.0.1:80...
* Connected to localhost (127.0.0.1) port 80 (#0)
> GET / HTTP/1.1
> Host: localhost
> User-Agent: curl/8.0.1
> Accept: */*
>
< HTTP/1.1 302 Found
< Date: Sun, 12 Nov 2023 01:26:55 GMT
< Server: Apache/2.4.47 (Win64) OpenSSL/1.1.1k PHP/8.0.6
< X-Powered-By: PHP/8.0.6
< Location: http://localhost/dashboard/
< Content-Length: 0
< Content-Type: text/html; charset=UTF-8
<
* Connection #0 to host localhost left intact
Then, use `telnet` command can be employed to quickly check if a specific port is open and reachable.
telnet localhost 3306
Before switching to Docker instead of XAMPP and setting up localhost on port 3306 for MySQL, check if port 3306 is free. If it's in use, close the current process quickly.
On Windows
» Check MySQL Port Usage with netstat
netstat -ano | find "3306"
» Then, proceed to kill the process associated with the identified <PID>
taskkill /F /PID <PID>
Docker Hub provides a diverse collection of container images designed for specific packages like MySQL, phpMyAdmin, and Apache HTTP Server (httpd). These images can be used to set up environments, replacing the need for tools like XAMPP.
- phpmyadmin: https://hub.docker.com/_/phpmyadmin
- mysql: https://hub.docker.com/_/mysql
- httpd: https://hub.docker.com/_/httpd
Using these Docker images, you can create a Docker Compose configuration to set up a development environment with PHP, MySQL, and Apache similar to what XAMPP provides. Docker introduces several key terms and concepts. Here's a list of important Docker terms along with brief explanations:
- Image » lightweight, standalone, and executable package that includes everything needed to run a piece of software, including the code, runtime, libraries, environment variables, and config files.
- Container » a runnable instance of a Docker image. It encapsulates an application and its dependencies, ensuring consistency across different environments.
- Dockerfile » text file without extension that contains instructions for building a Docker image.
- Registry » a centralized repository for Docker images. Docker Hub is a popular public registry, and private registries can be set up for custom or sensitive images.
- Docker Hub » is a cloud-based registry service where you can find and share container images.
- Compose » a tool for defining and running multi-container Docker applications.
- Swarm » a native clustering and orchestration solution for Docker.
- Service » is a scalable unit that defines how a container should behave in a swarm.
- Volume » is a way to persistently store data outside the container. Volumes allow data to persist even if the container is stopped or removed, facilitating data sharing between the host and containers.
- Network- a networking feature that allows containers to communicate with each other or with the external world. Docker networks enable isolation and secure communication between containers.
II. Using Docker Instead of XAMPP
First and foremost, visit the Docker website to install Docker on your local machine, depending on the operating system you are using.
After installing Docker, make sure everything went well by either opening the Docker Desktop app or checking the version using the command prompt.
docker --version
In our Laravel Vue project, we are using PHP version 8.0.6. To ensure compatibility and consistency, we will now proceed to configure the Docker Compose file (docker-compose.yml) to use this specific PHP version.
» PHP: Run the command `php -v` to check the version of PHP on your local machine when it's set up using XAMPP.
PHP 8.0.6 (cli) (built: May  4 2021 23:31:45) ( ZTS Visual C++ 2019 x64 )
Copyright (c) The PHP Group
Zend Engine v4.0.6, Copyright (c) Zend Technologies
» MySQL: Run the command `C:\xampp\mysql\bin>mysql -V` to check the version of MySQL. The result should look like this:
mysql Ver 15.1 Distrib 10.4.24-MariaDB, for Win64 (AMD64), source revision b4477ae73c836592268f7fb231eeb38a4fa83bb6
Let us proceed to create the docker-compose.yml file in the root directory of your Laravel project. This file will configure ports for your services, with MySQL running on Port 3306, enabling access from localhost or 127.0.0.1.
If you are using PHP 8.0.6 and MariaDB 10.4.24, you need to adjust the Docker Compose file to use the appropriate PHP and MariaDB images.
» docker-compose.yml
version: '3'

services:
  web:
    image: php:8.0.6-apache
    ports:
      - "127.0.0.1:80:80"  # Bind to localhost
    volumes:
      - .:/var/www/html
    depends_on:
      - mysql


  mysql:
    image: mariadb:10.4.24
    environment:
      MYSQL_DATABASE: admin_flagtick
      MYSQL_USER: root
      MYSQL_PASSWORD: ""
      MYSQL_ROOT_PASSWORD: ""
    ports:
      - "127.0.0.1:3306:3306"  # Bind to localhost
Use the container_name attribute to specify a custom name for your container. Here is how you can modify your docker-compose.yml file:
version: '3'

services:
  flagtick_php:
    image: php:8.0.6-apache
    container_name: flagtick_php
    ports:
      - "127.0.0.1:80:80"  # Bind to localhost
    volumes:
      - .:/var/www/html
    depends_on:
      - mysql

  mysql:
    image: mariadb:10.4.24
    container_name: flagtick_mysql
    environment:
      MYSQL_DATABASE: admin_flagtick
      MYSQL_USER: root
      MYSQL_PASSWORD: cJdbDSxdmocgdVH
      MYSQL_ROOT_PASSWORD: cJdbDSxdmocgdVH
    ports:
      - "127.0.0.1:3306:3306"  # Bind to localhost
» Build and Run Docker Containers
docker-compose up -d
» Stop and Remove Containers
docker-compose down
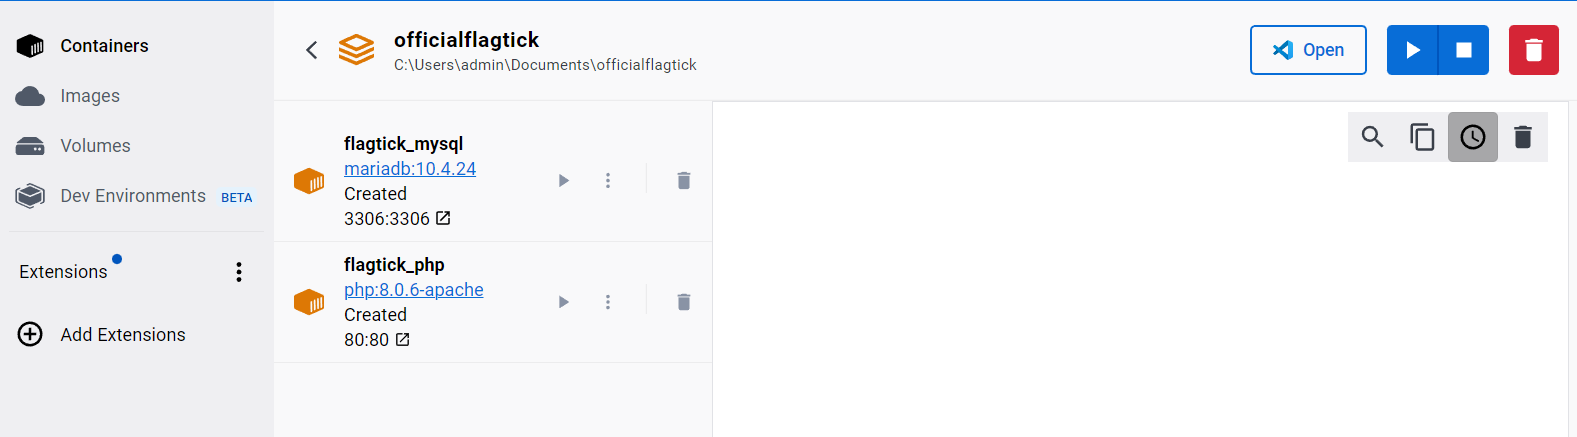
After running `docker-compose up -d`, check Docker Desktop to see the newly created containers and their status.
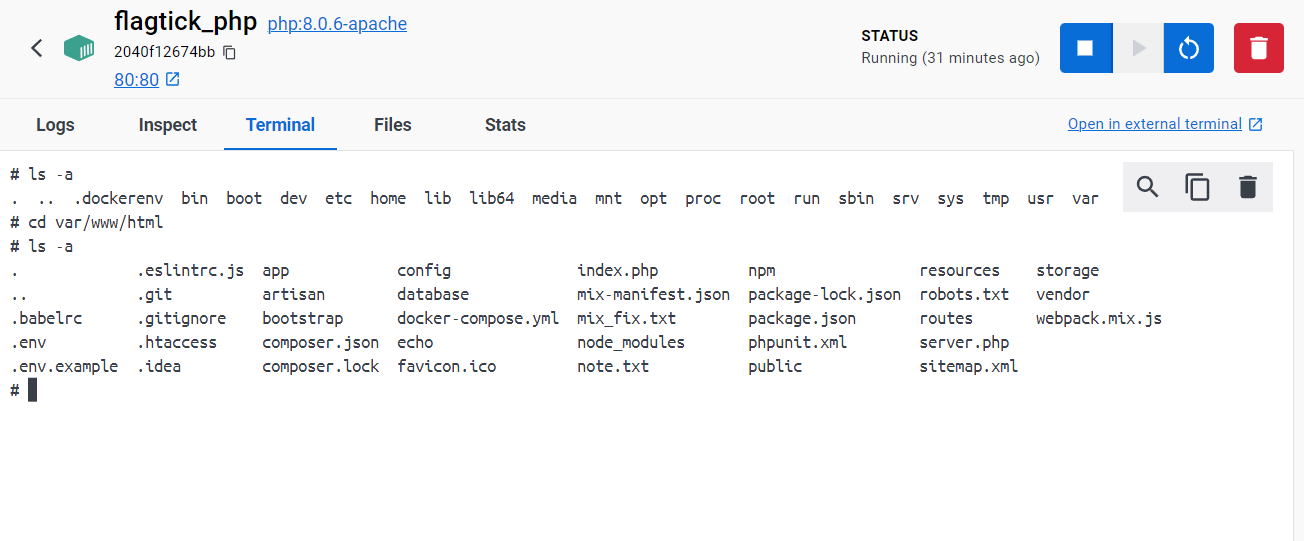
In your docker-compose.yml file, you have mounted the current project directory to the /var/www/html directory inside the flagtick_php container:
volumes:
  - .:/var/www/html
Your project on your local machine is mapped to the web server's document root inside the container.
If your local project is running on port 8000, and you want to access it from the flagtick_php container, you need to make sure that the Apache server inside the container is also configured to listen on port 8000. Additionally, you should update the port mapping in the docker-compose.yml file.
flagtick_php:
    image: php:8.0.6-apache
    container_name: flagtick_php
    ports:
      - "127.0.0.1:8000:80"  # Bind to localhost on port 8000
    volumes:
      - .:/var/www/html
    depends_on:
      - mysql
If you only update the port configuration for the flagtick_php container in the docker-compose.yml file, you can apply the changes specifically to that container without recreating the entire stack.
docker-compose up -d --no-deps flagtick_php
docker-compose ps
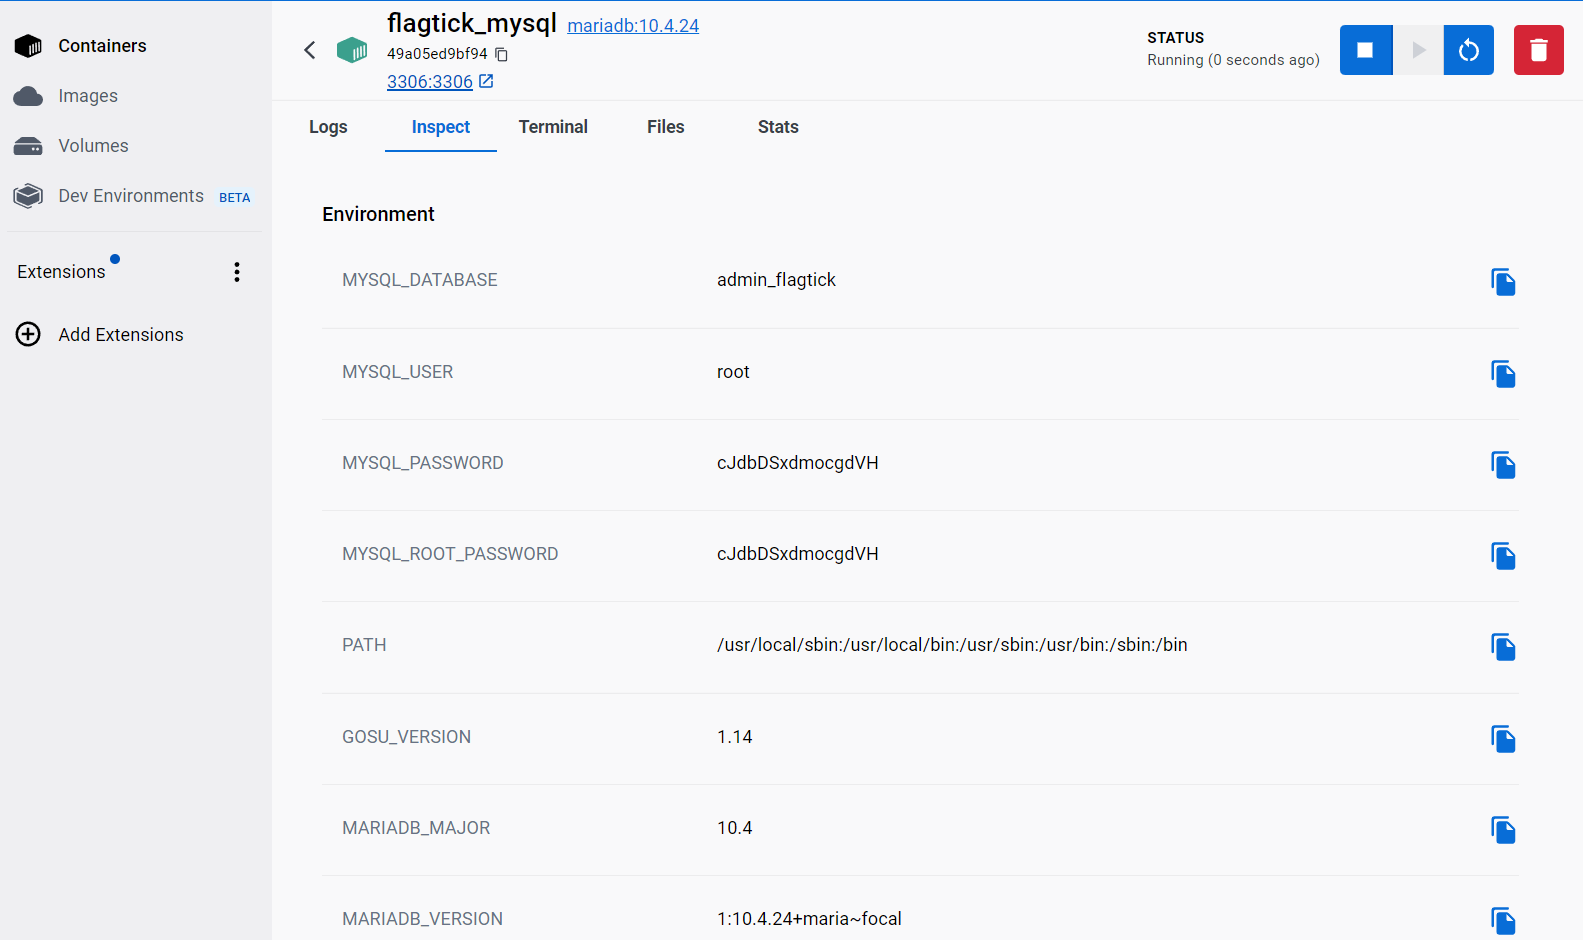
In Docker Desktop, you can view and modify the configuration for the MySQL service by navigating to the Inspect tab and locating the Environment section.
There are two approaches to understanding the MySQL service and accessing the database via the command line:
» Using Docker Desktop Terminal:
mysql -uroot -p
» From Your Local Machine:
docker exec -it flagtick_mysql mysql -uroot -p
When executing the command above, you will be prompted to enter the password to access the console screen. From there, you can perform various actions, such as displaying databases and accessing tables.
docker exec -it flagtick_mysql mysql -uroot -p
Enter password:
Welcome to the MariaDB monitor.  Commands end with ; or \g.
| Database           |
+--------------------+
| admin_flagtick     |
| information_schema |
| mysql              |
| performance_schema |
+--------------------+
4 rows in set (0.001 sec)

MariaDB [(none)]> USE admin_flagtick;
Database changed
MariaDB [admin_flagtick]> ... <Using \q to exit>
To access MySQL from a graphical user interface (GUI) and perform administrative tasks more conveniently, you can use tools like phpMyAdmin. When you access MySQL using 127.0.0.1:3306, you are connecting directly to the MySQL server.
III. Simplify MySQL Administration with phpMyAdmin
Interact with MySQL databases effortlessly through a user-friendly web interface provided by phpMyAdmin. This proves especially helpful for tasks like database management, querying, and data visualization.
» docker-compose.yml
version: '3'

services:
  flagtick_php:
    image: php:8.0.6-apache
    container_name: flagtick_php
    ports:
      - "127.0.0.1:8000:80"  # Bind to localhost on port 8000
    volumes:
      - .:/var/www/html
    depends_on:
      - mysql

  mysql:
    image: mariadb:10.4.24
    container_name: flagtick_mysql
    environment:
      MYSQL_DATABASE: your_database_name
      MYSQL_USER: root
      MYSQL_PASSWORD: ""
      MYSQL_ROOT_PASSWORD: ""
    ports:
      - "127.0.0.1:3306:3306"  # Bind to localhost

  phpmyadmin:
    image: phpmyadmin/phpmyadmin
    container_name: flagtick_phpmyadmin
    environment:
      PMA_HOST: mysql
    ports:
      - "127.0.0.1:8080:80"  # Bind phpMyAdmin to localhost on port 8080
    depends_on:
      - mysql
Analyze the phpMyAdmin service, which is set up in a container named `flagtick_phpmyadmin` and is accessible through port 8080 for a visual graphical user interface (GUI). Run the command `docker-compose up -d --no-deps phpmyadmin` to set up the phpMyAdmin service independently without affecting other running services.
docker-compose up -d --no-deps phpmyadmin
Then, observe and enter the username 'root' and the previously stated password. Open 127.0.0.1:8080 to access the database management interface.
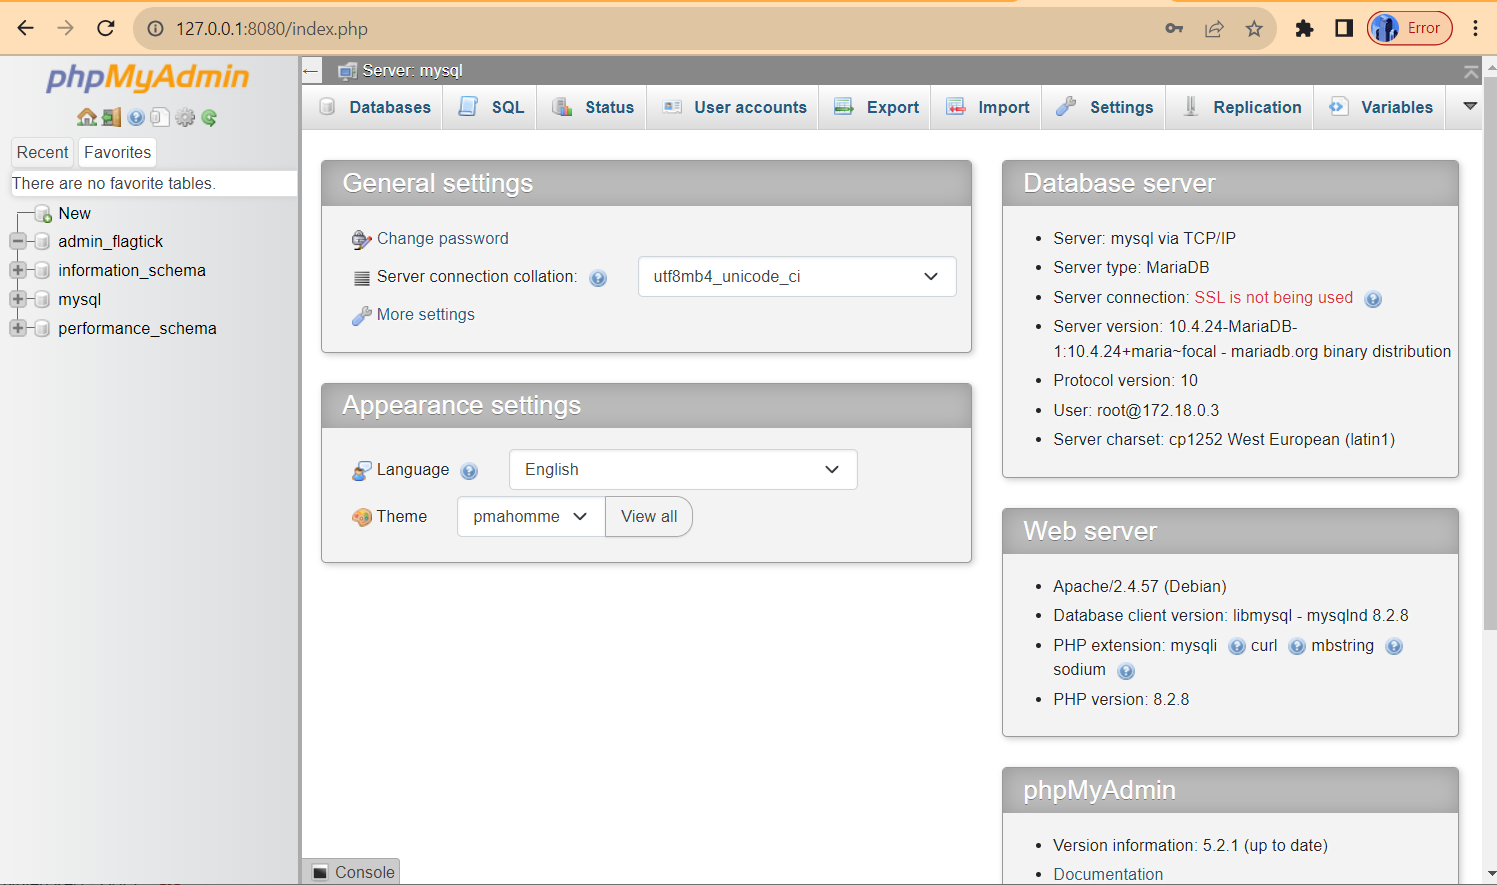
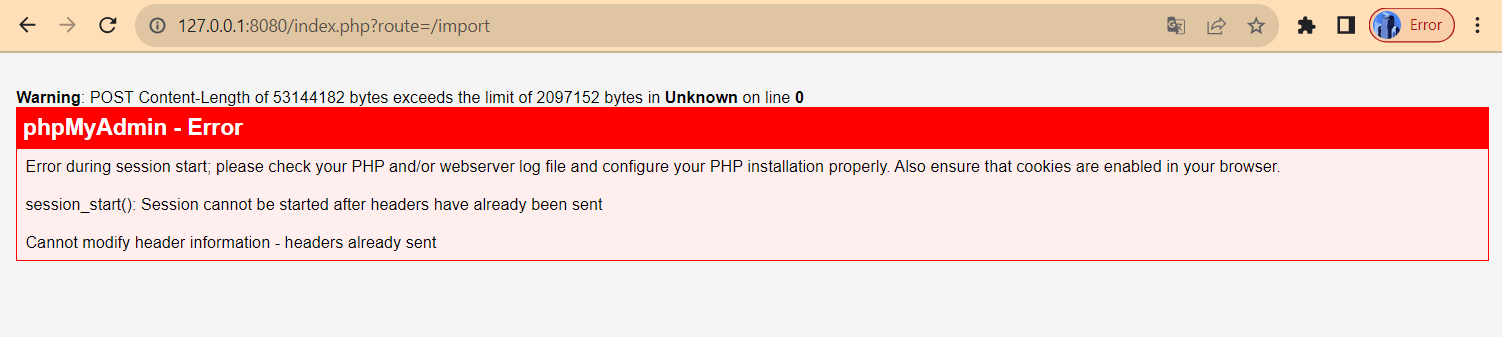
We can try preparing the `admin_flagtick.sql` file and importing it into a database named `admin_flagtick`. Here is the error we received after performing these manipulations.
Access the php.ini file for the phpMyAdmin service. This file might be located in the container at a path like /usr/local/etc/php/php.ini.
docker exec -it flagtick_phpmyadmin nano /usr/local/etc/php/php.ini
or
docker exec -it flagtick_phpmyadmin /bin/bash
find /etc -name php.ini
cd //
nano /usr/local/etc/php/php.ini
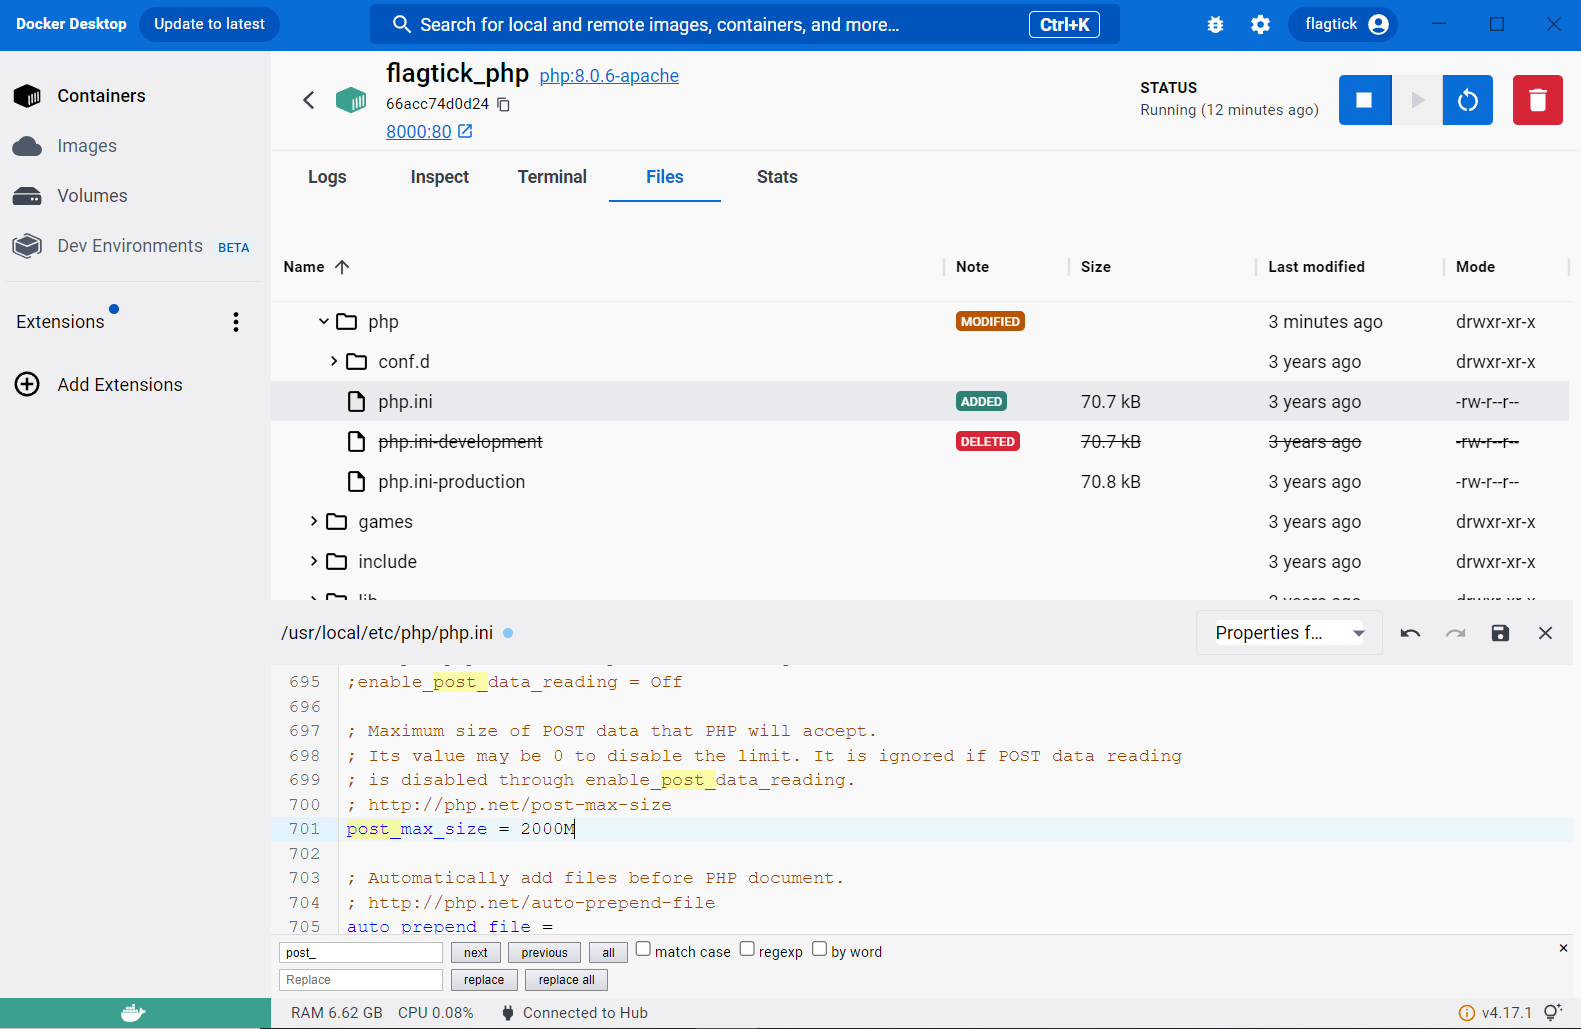
Inside the `php.ini` file, find the following lines and modify them accordingly:
upload_max_filesize = 2000M
post_max_size = 2000M
Restart the flagtick_php container using the following command:
docker-compose restart phpmyadmin
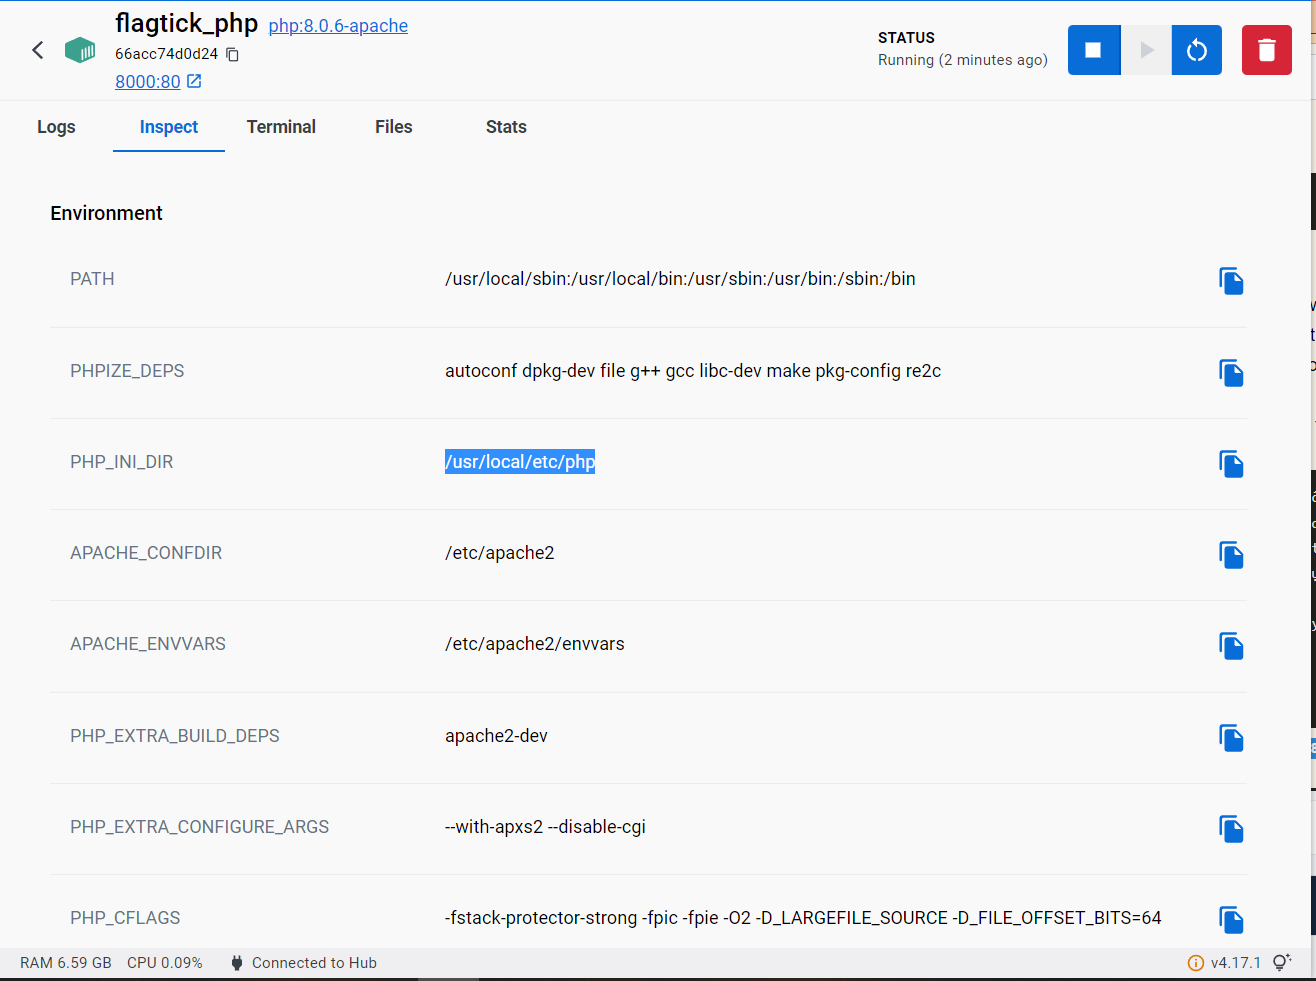
You can also view the PHP directory from the 'Inspect' tab in the Docker Desktop application.
Open the terminal tab, navigate to `/usr/local/etc/php`, rename `php.ini-development` to `php.ini`, and make custom modifications for the two properties mentioned above.
mv php.ini-development php.ini
nano php.ini
In another approach, you can navigate to the File tab and directly modify the php.ini file within the container service using the Docker Desktop application. After making the changes, restart the container.
IV. Complete Run Laravel Vue App on Docker
When you run a service in a Docker container, it operates within its own network namespace. By default, a service inside a Docker container cannot be accessed using localhost from the host machine. This is because localhost within the container refers to the container itself, not the host machine.
Assume that our project needs to establish a service to handle deep search, and that service is running on port 9200 in localhost. We will check whether the port is being used by any other service on the local machine, as shown below:
» On your local machine
 TCP    0.0.0.0:9200           0.0.0.0:0              LISTENING       2480
 TCP    [::]:9200              [::]:0                 LISTENING       2480
» docker-compose.yml
elasticsearch:
  image: docker.elastic.co/elasticsearch/elasticsearch:7.10.0
  container_name: my_elasticsearch
  environment:
    - discovery.type=single-node
  ports:
    - "9200:9200"
As we can see above, there are changes to the docker-compose.yml file and to apply those changes to the Elasticsearch service, you would typically use the following command:
docker-compose up -d --no-deps elasticsearch
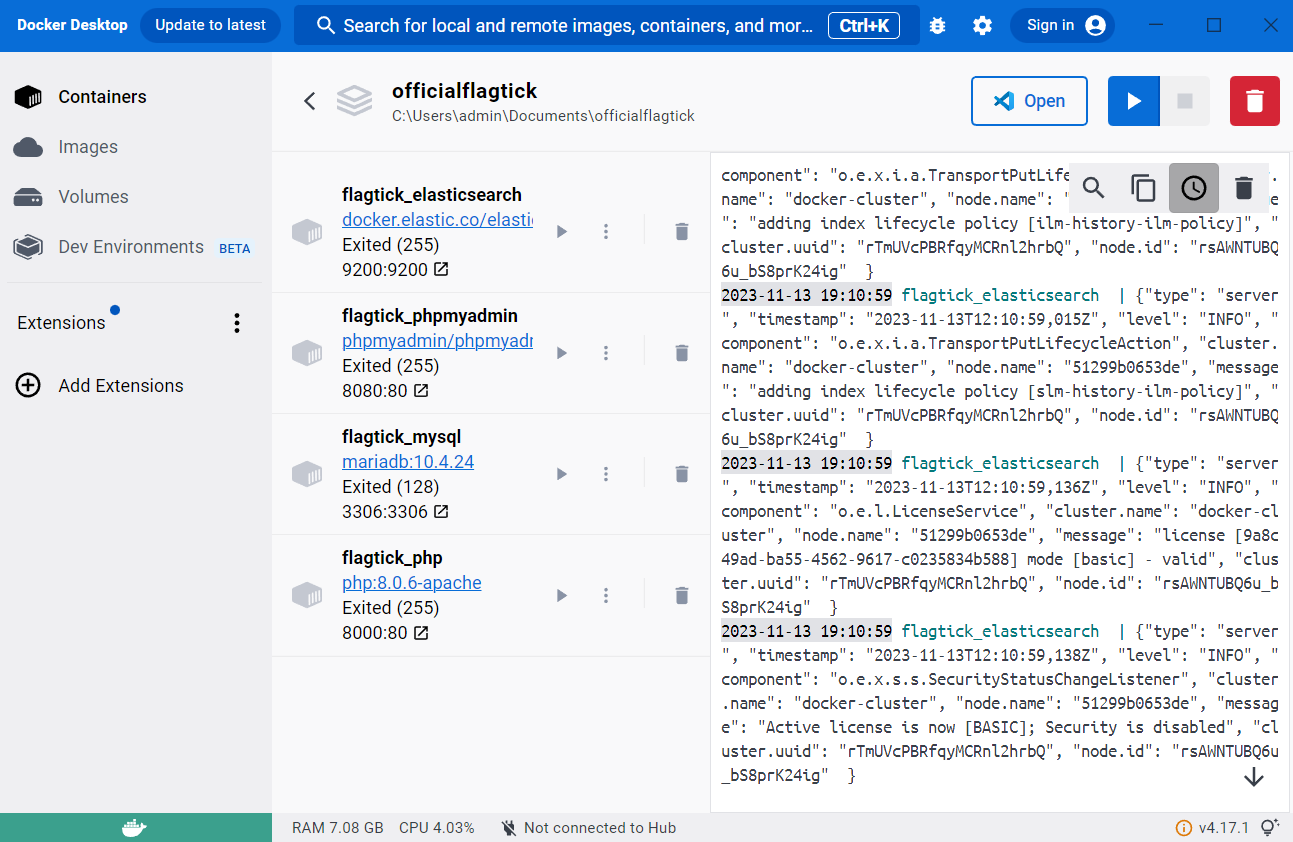
As you can see here, we will review the installed containers and their statuses, such as running, and paused in Docker Desktop.
To avoid encountering the issue of `No alive nodes found in your cluster` with Elasticsearch, it is crucial to set up a master node. Follow this link to identify the established master node in your Elasticsearch cluster: http://127.0.0.1:9200/_cat/master?v.
hostname
Verify the internal IP address of the Elasticsearch container:
docker inspect -f '{{range .NetworkSettings.Networks}}{{.IPAddress}}{{end}}' flagtick_elasticsearch
>>
172.18.0.5
We conduct to change 172.18.0.5 into 127.0.0.1 to force Elasticsearch can be accessible on 127.0.0.1 on the host machine.
» docker-compose.yml
elasticsearch:
    image: docker.elastic.co/elasticsearch/elasticsearch:7.10.0
    container_name: flagtick_elasticsearch
    environment:
      - discovery.type=single-node
    ports:
      - "127.0.0.1:9200:9200"
    volumes:
      - ./elasticsearch_config/elasticsearch.yml:/usr/share/elasticsearch/config/elasticsearch.yml
On Linux
» run_elasticsearch.sh
#!/bin/bash

# Create elasticsearch.yml file
touch elasticsearch_config/elasticsearch.yml
echo "network.host: 127.0.0.1" > elasticsearch_config/elasticsearch.yml
echo "http.host: 127.0.0.1" >> elasticsearch_config/elasticsearch.yml
echo "transport.host: localhost" >> elasticsearch_config/elasticsearch.yml

# Run Docker Compose
docker-compose up -d --no-deps elasticsearch
Make the script executable by running the following command in the terminal:
chmod +x run_elasticsearch.sh
Execute the script to create the elasticsearch.yml file and run Docker Compose:
./run_elasticsearch.sh
On Windows
» run_elasticsearch.bat
REM Create elasticsearch.yml file

type nul > elasticsearch_config\elasticsearch.yml
echo network.host: 127.0.0.1 > elasticsearch_config\elasticsearch.yml
echo http.host: 127.0.0.1 >> elasticsearch_config\elasticsearch.yml
echo transport.host: localhost >> elasticsearch_config\elasticsearch.yml

REM Run Docker Compose
docker-compose up -d --no-deps elasticsearch
Save the file and then double-click on run_elasticsearch.bat to execute it. Alternatively, you can run it from the command prompt:
.\run_elasticsearch.bat
If you are unable to change to 127.0.0.1, you can directly set the host to 127.0.0.1 when declaring the Elasticsearch instance. Here is an example:
$client = ClientBuilder::create()
    ->setHosts(['172.18.0.5:9200'])
    ->build();
The Dockerfile is used to define a set of instructions for building a Docker image.
» Dockerfile
# Use the official PHP with Apache image
FROM php:8.0.6-apache
» docker-compose.yml
flagtick_php:
  build:
    context: .
    dockerfile: Dockerfile
  container_name: flagtick_php
  ports:
    - "127.0.0.1:8000:80"  # Bind to localhost
  volumes:
    - .:/var/www/html/public
  depends_on:
    - mysql
You need to attention to the index.php in the public directory. Therefore, you need to modify the index.php file to load URLs from the root instead of the public directory.
V. Conclusion
In this article, you will learn how to successfully build and Dockerize a full-stack Laravel Vue application, integrating critical services like Apache2, PHP, MySQL, PhpMyAdmin, and Elasticsearch. This comprehensive deployment ensures a seamless and scalable development environment for the entire stack, moving away from traditional approach of relying on XAMPP.
VI. Video