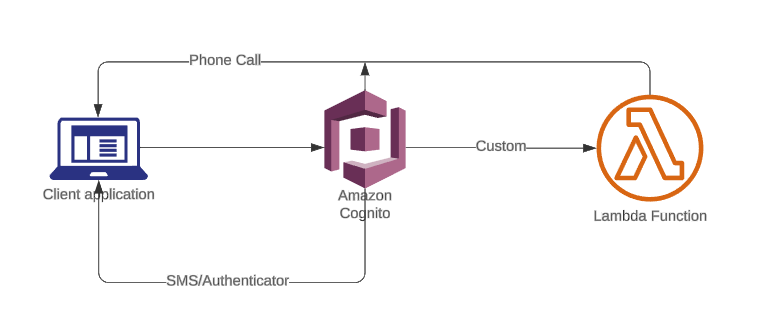
While working with Cognito and integrating Multi-Factor Authentication (MFA), we encountered an issue: Cognito does not support delivering MFA codes via phone call. Currently, it only supports MFA via SMS messages and Authenticator Apps. This limitation posed a challenge when attempting to integrate a call feature alongside SMS and Authenticator app functionalities within a single service.
However, with AWS services available, we sought to provide a solution to address this challenge. Our article aims to present an approach to implement the calling feature without the need to set up and rely on third-party services, which can become cumbersome to maintain and manage over time.
I. Setting Up Outbound Voice Flows with Amazon Connect
Most developers can sign up for an AWS Free Tier account on the AWS website, accessing the Management Console to manage resources. While many services are free, AWS Connect may not be included. To access AWS Connect, create a support ticket for permission from AWS Support.
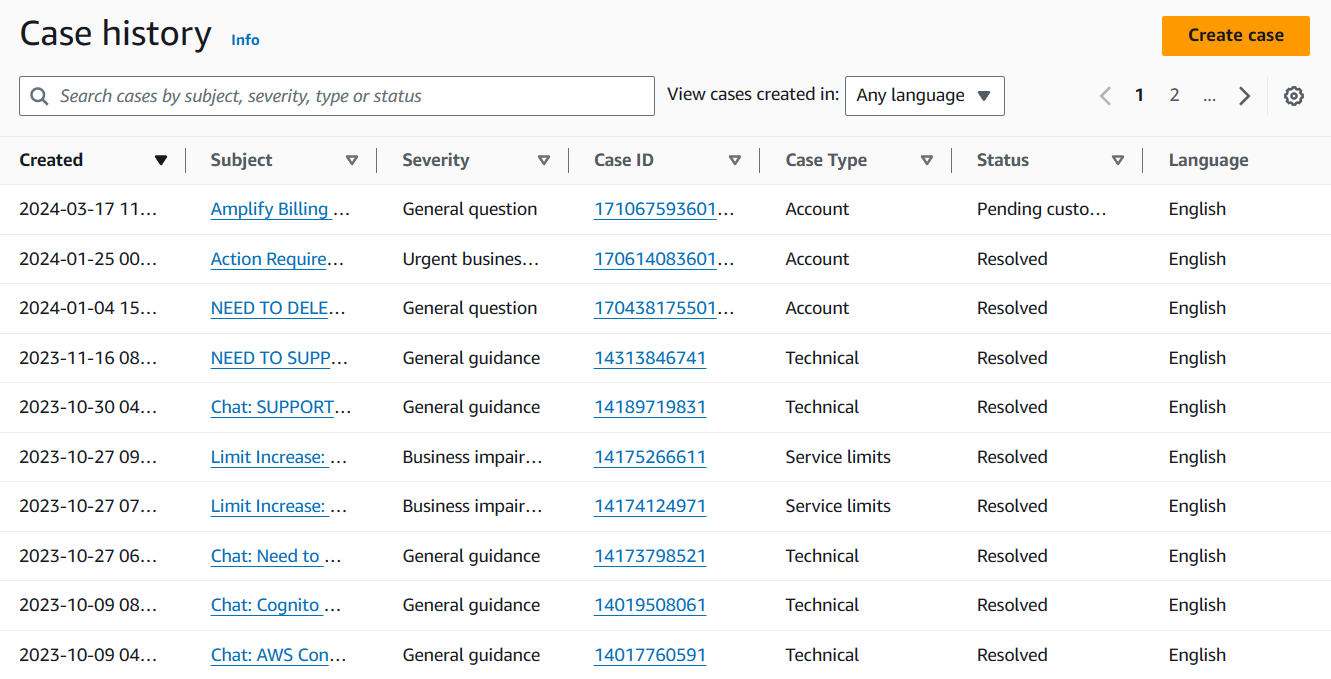
Note: As you can see Service limits can support you in overcoming restrictions when expanding your use of AWS services as an AWS account developer.
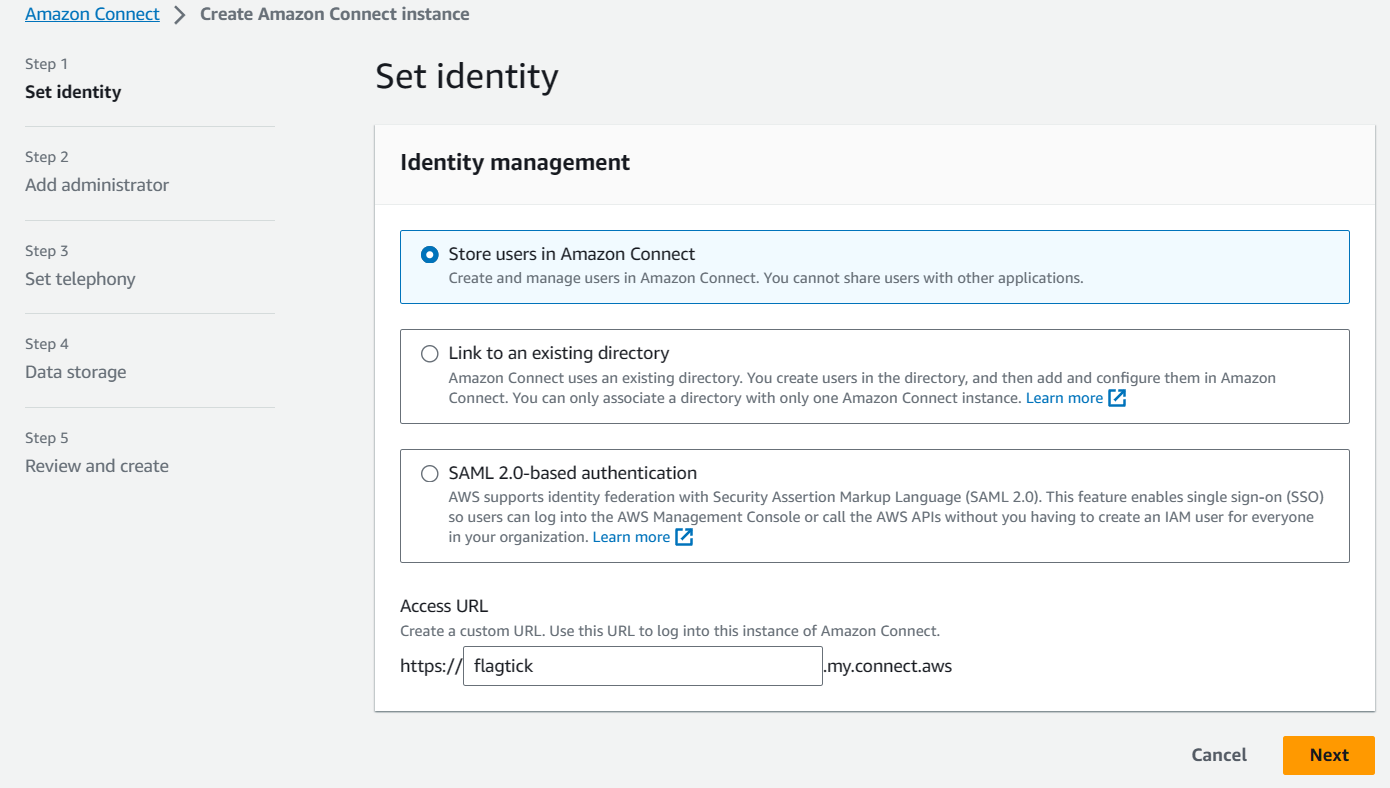
Set up your Amazon Connect instance and select the option to `Store users in Amazon Connect`. Additionally, define a custom URL to access the AWS dashboard of Amazon Connect.
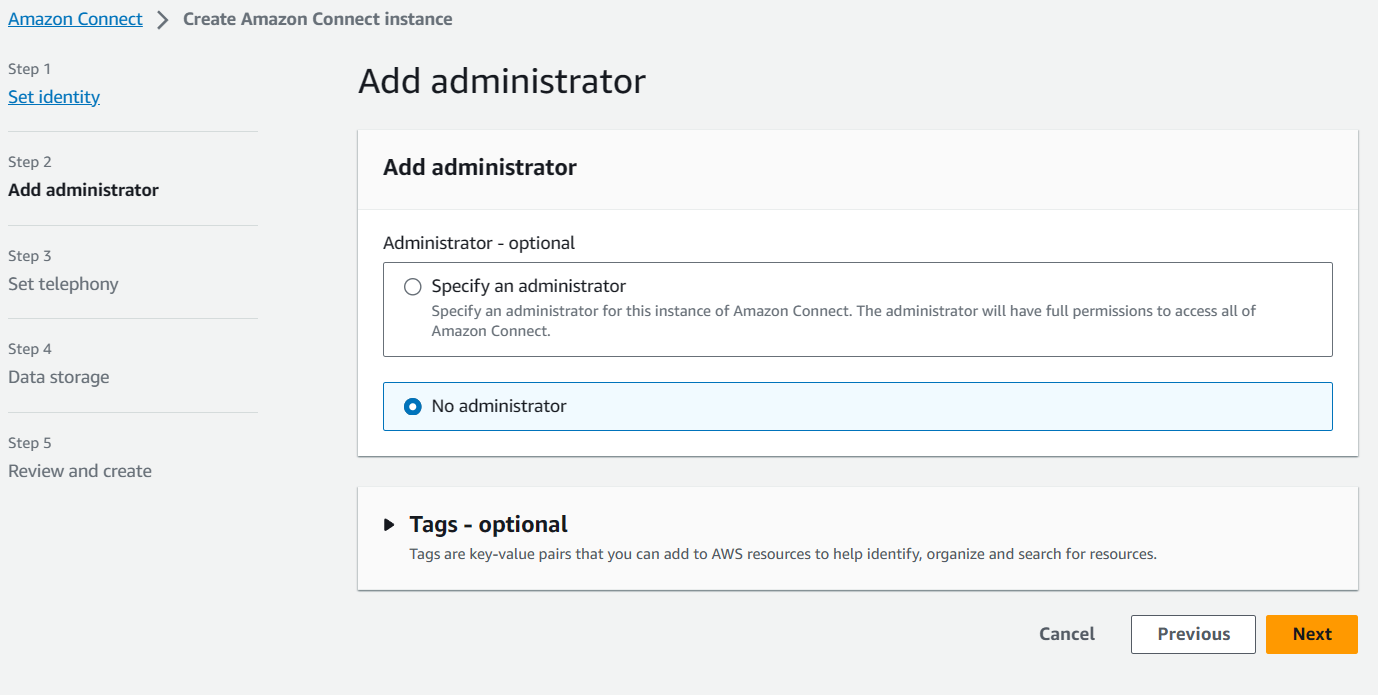
In AWS Connect, when proceeding to step 2, you will need to add an administrator to grant them the capability to adjust connect flows within the instance.
To illustrate which AWS Connect identifiers to use for configuring the outbound call service, we can refer to the following command:
start-outbound-voice-contact
[--name <value>]
[--description <value>]
[--references <value>]
[--related-contact-id <value>]
--destination-phone-number <value>
--contact-flow-id <value>
--instance-id <value>
[--client-token <value>]
[--source-phone-number <value>]
[--queue-id <value>]
[--attributes <value>]
[--answer-machine-detection-config <value>]
[--campaign-id <value>]
[--traffic-type <value>]
[--cli-input-json <value>]
[--generate-cli-skeleton <value>]
[--debug]
[--endpoint-url <value>]
[--no-verify-ssl]
[--no-paginate]
[--output <value>]
[--query <value>]
[--profile <value>]
[--region <value>]
[--version <value>]
[--color <value>]
[--no-sign-request]
[--ca-bundle <value>]
[--cli-read-timeout <value>]
[--cli-connect-timeout <value>]
Refer to the link https://docs.aws.amazon.com/cli/latest/reference/connect/start-outbound-voice-contact.html to find that `instance-id` constitutes one part of the Amazon Resource Name (ARN) for the instance.
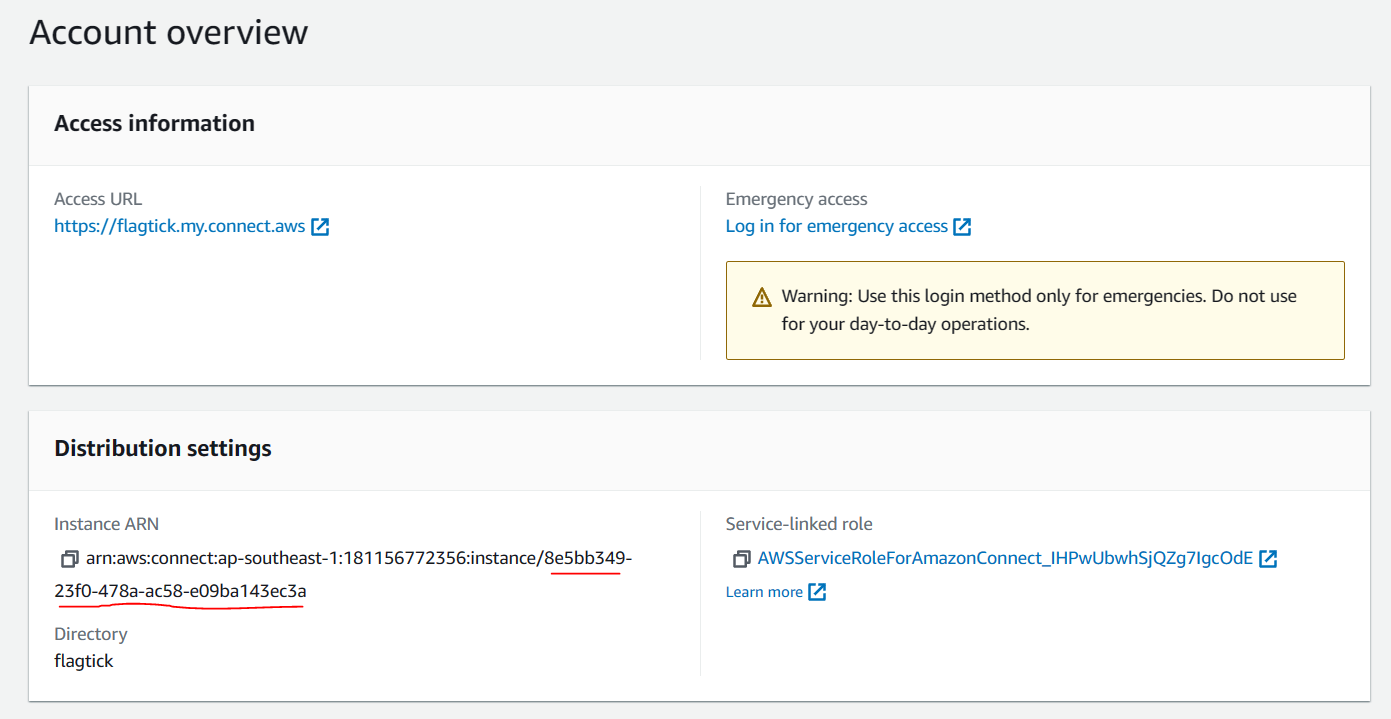
The next step is to ensure that you have created administrator access. Alternatively, if you choose the option `No administrator,' click on Login for emergency access to access the AWS Connect dashboard.
For example:
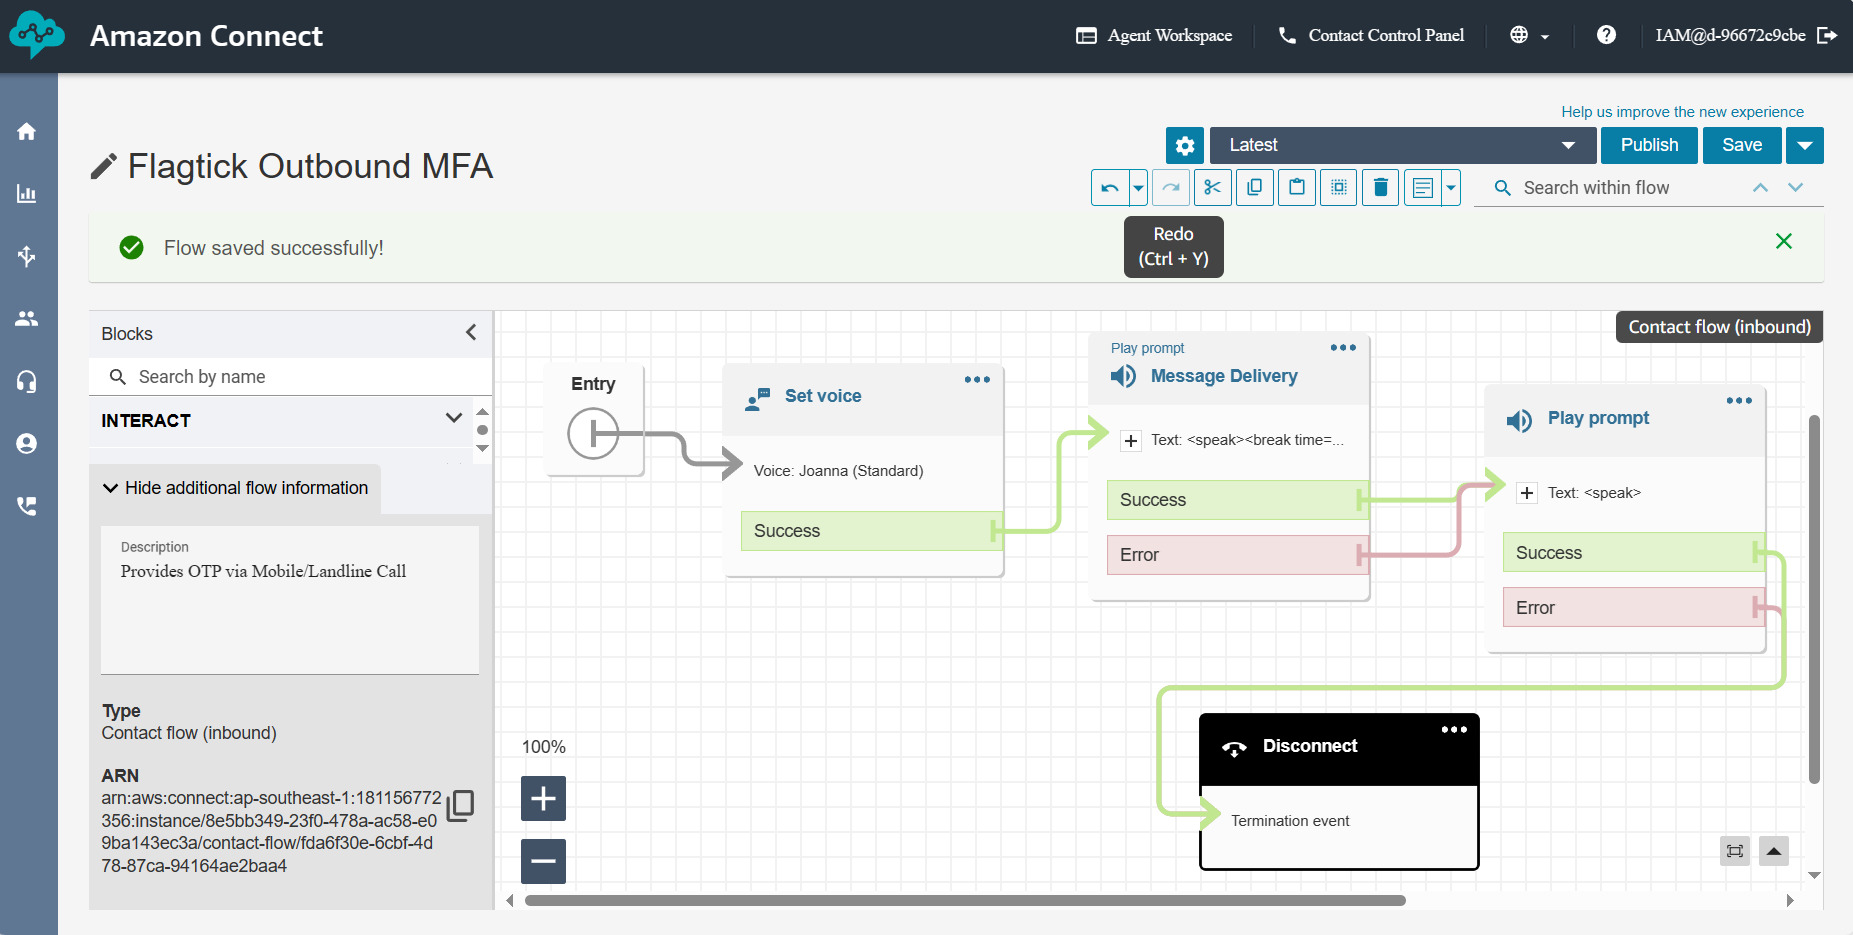
This string of characters, `fda6f30e-6cbf-4d78-87ca-94164ae2baa4`, is our contact flow ID. You can find it in the screenshot above. Let us break down each block in AWS Connect, including Set Voice, Message Delivery, Play Prompt, and Disconnect.
» Set Voice
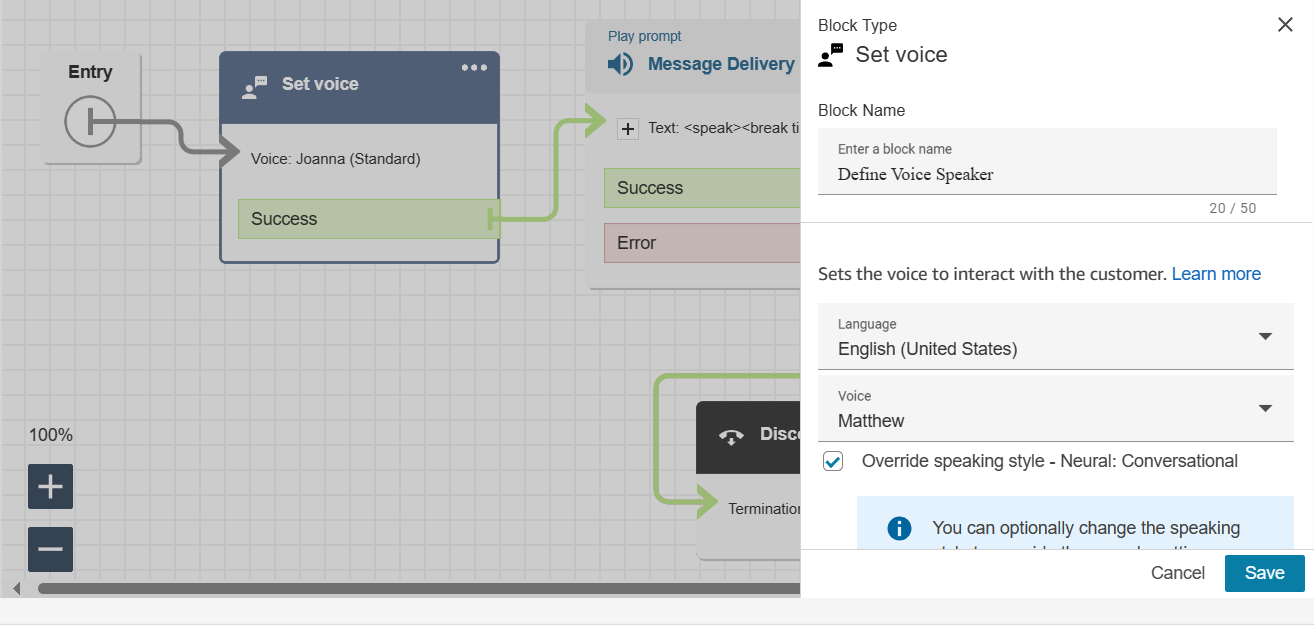
This block allows you to configure attributes related to the voice interaction within a contact flow, such as setting the voice, language, and speech rate for prompts and messages played during a call.
» Message Delivery
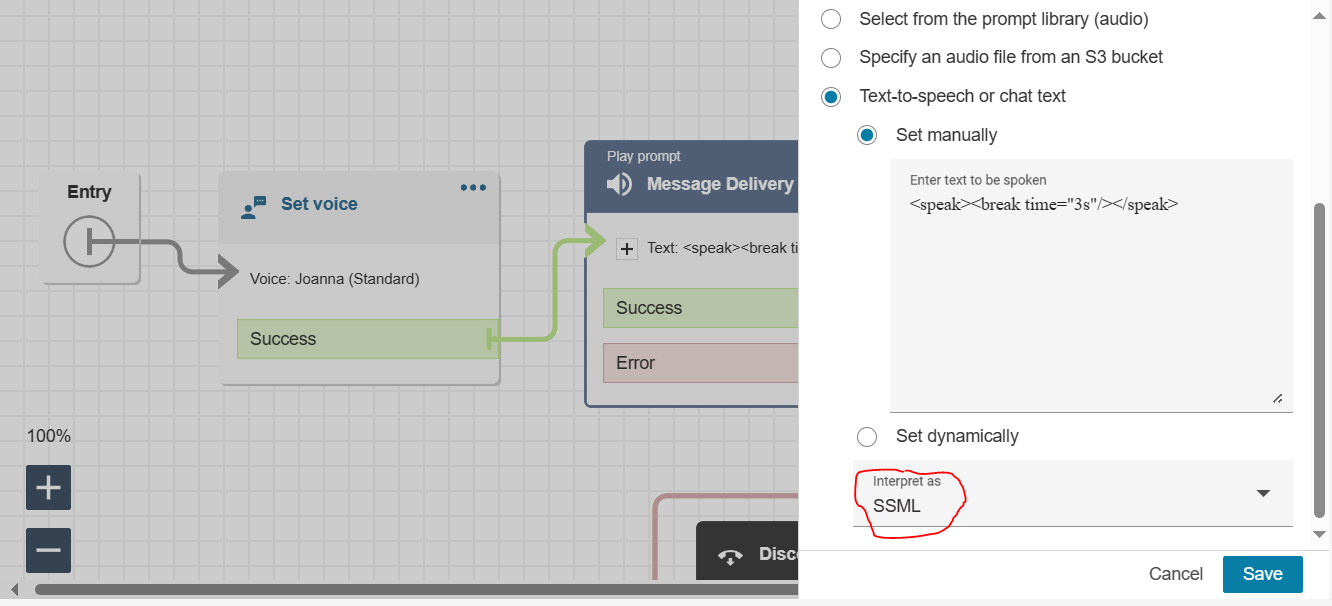
Note: Leverage AWS Connect that support SSML (Speech Synthesis Markup Language), which is a markup language used to control aspects of synthesized speech output such as pronunciation, pitch, volume, and speed.
» Play prompt
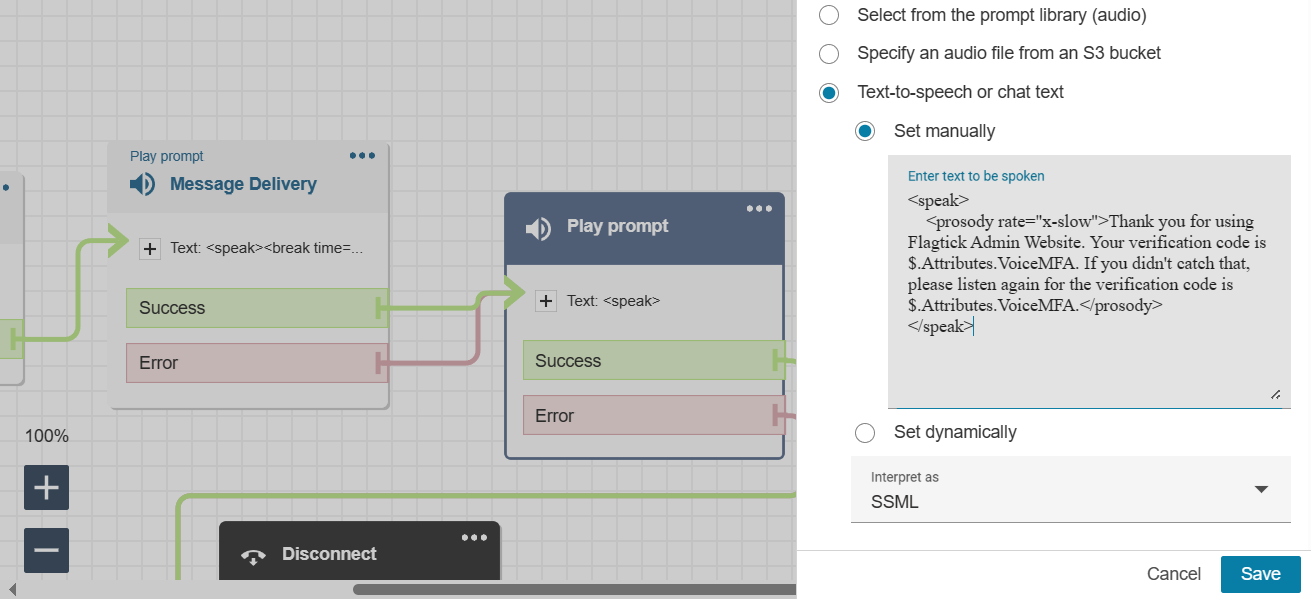
Note: `$.Attributes.VoiceMFA` is one approach to retrieve data from a Lambda function and use it in AWS Connect. However, there are numerous alternative methods available for achieving this integration.
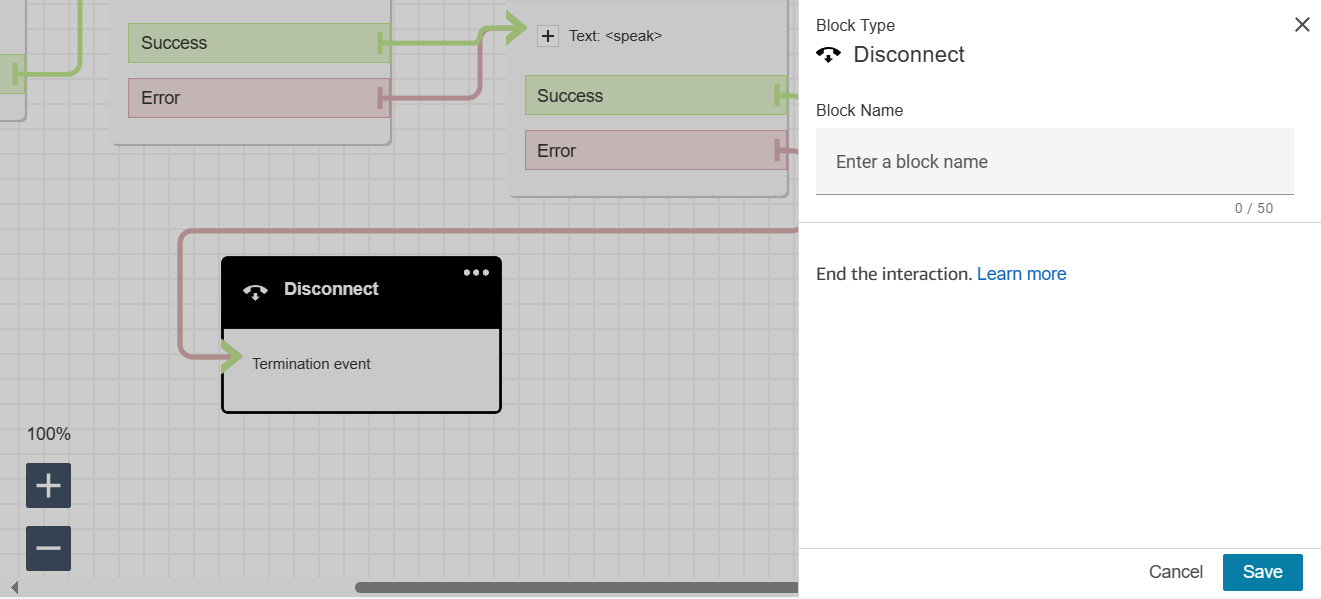
» Disconnect
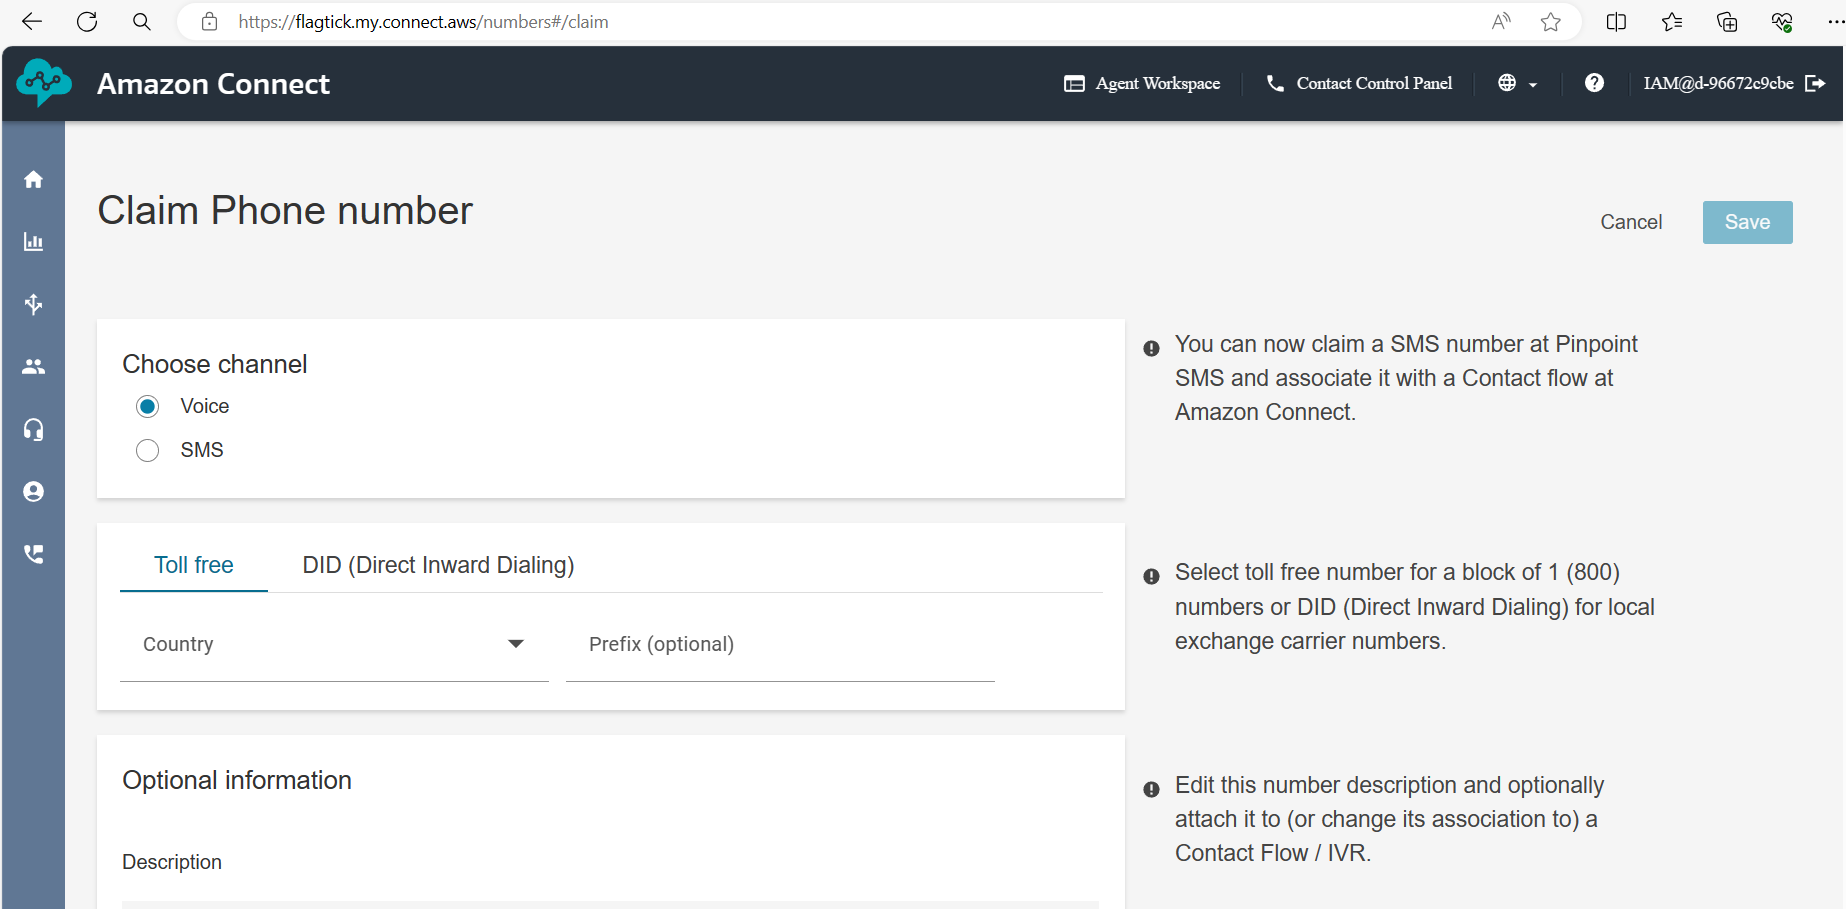
Let us proceed with setting up the destination phone number for your contact center instance. We will use the Claim Phone Number feature provided by AWS Connect.
After successfully setting up the AWS Connect instance and obtaining essential configurations for setting up outbound calls either via AWS CLI or Lambda, our next step involves working with Lambda functions for this implementation.
II. AWS Lambda Functions with Amazon Connect
First and foremost, Lambda functions integrate with API Gateway and Cognito. Therefore, using Lambda here can facilitate the full implementation of your outbound call-out feature with configurations from AWS Connect.
For example, Cognito can serve as an example if we intend to deliver OTP code through SMS, Authenticator, and Call features.

There are various methods to create an AWS Lambda function, but this tutorial will focus on two commonly used approaches:
- AWS Management Console
- AWS CLI (Command Line Interface)
Let us dive into the AWS Management Console. Make sure you have permission to create AWS Lambda functions. If you encounter access restrictions, reach out to AWS Support for assistance in removing any limitations on your account.
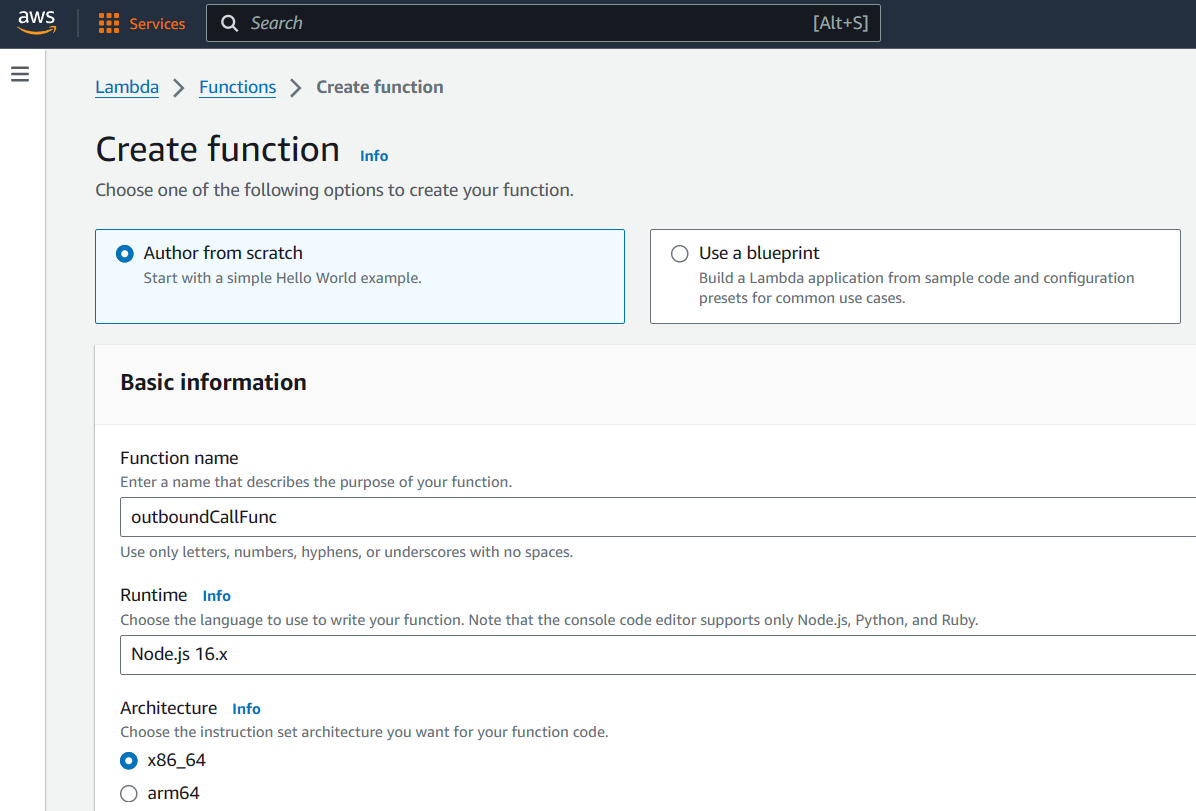
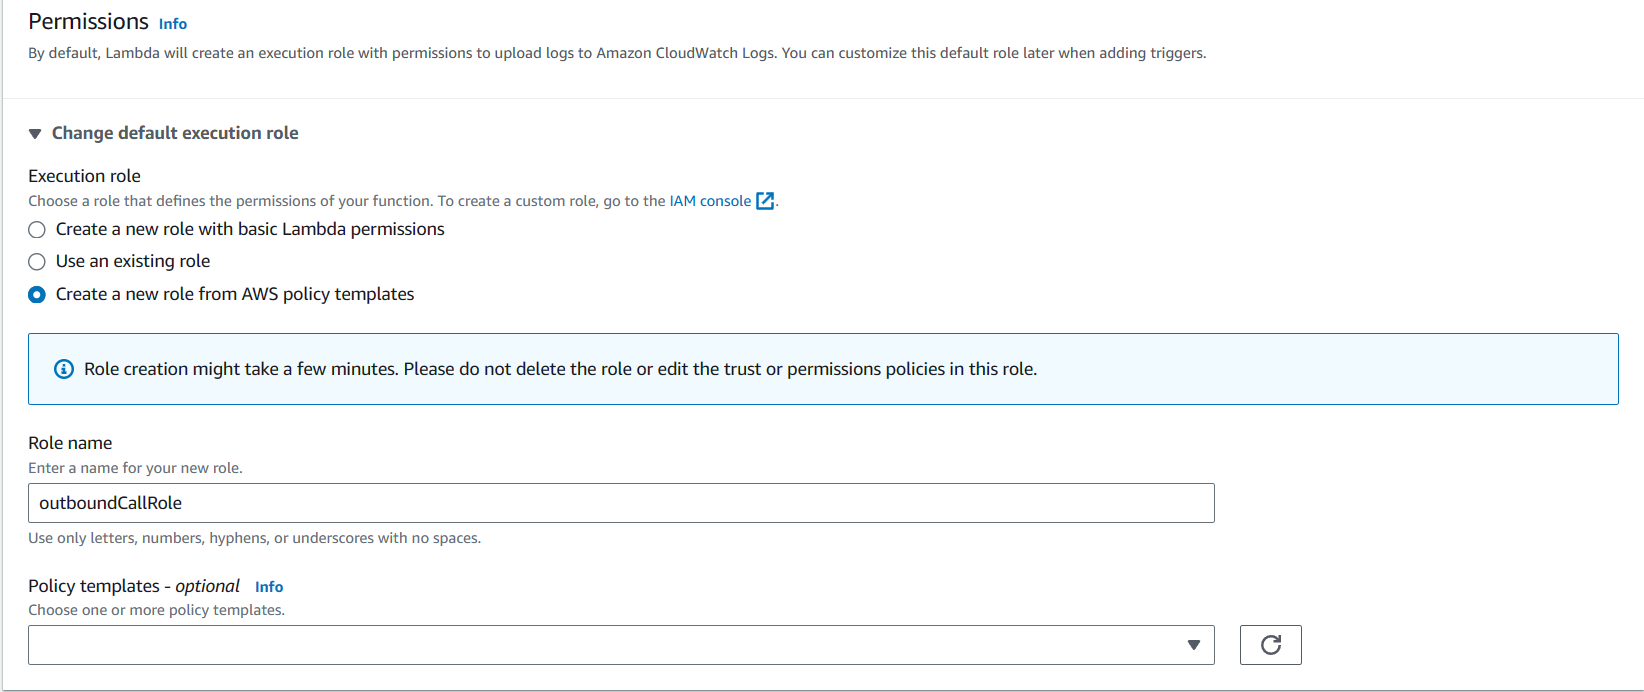
Upon creating Lambda function, it is important to carefully configure the execution role or Virtual Private Cloud (VPC) settings to prevent unauthorized access.
After successfully creating the `outboundCallFunc` Lambda function, you will find its Function ARN represented as follows.
arn:aws:lambda:<region>:<AWS Account ID>:function:outboundCallFunc
Note: You need to take note of the ARN and associate it with the services you intend to use within the Lambda function. Based on this, you will to modify the policy of the execution role (`outboundCallRole`) to grant permission for ARN to be accessing those services.
» index.js
const crypto = require('crypto');
const { outboundVoiceFunc } = require('./MFA.js');

exports.handler = async (event) => {

    let otpCode = crypto.randomInt(100000, 999999).toString();
    const optCodeStr = otpCode.toString().split('').join(' ');

    await outboundVoiceFunc({
      phoneNumber: '+12139156465',
      contactFlowId: 'fda6f30e-6cbf-4d78-87ca-94164ae2baa4',
      verificationCode: optCodeStr
    });
  return event;
};
Note: We add spaces between digits to ensure that each digit is read aloud distinctly (spaces will slow down the reading of the next digit).
» MFA.js
const AWS = require('aws-sdk');

AWS.config.update({ region: process.env.region });
const connect = new AWS.Connect();

async function outboundVoiceFunc(params) {
  try {
    const { phoneNumber, contactFlowId, otpCodeStr } = params;

    const connectParams = {
      DestinationPhoneNumber: phoneNumber,
      ContactFlowId: contactFlowId,
      InstanceId: '8e5bb349-23f0-478a-ac58-e09ba143ec3a',
      SourcePhoneNumber: '<claim phone number>',
      Attributes: { 'VoiceMFA': otpCodeStr }
    };

    await connect.startOutboundVoiceContact(connectParams).promise();
  } catch (error) {
    console.error('Error initiating the call', error);
    throw error;
  }
}

module.exports = { outboundVoiceFunc };
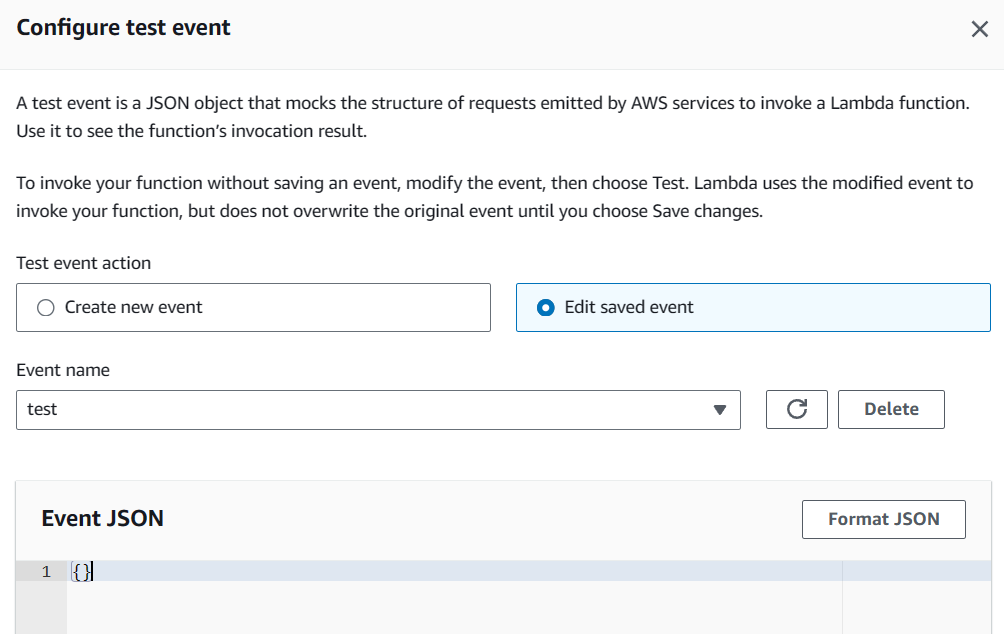
Configure test event in the Lambda function to execute the `outboundCallFunc` function.
In the execution results, errors may appear due to warnings related to the execution role named `outboundCallRole`.
ERROR Error initiating the call AccessDeniedException: User: arn:aws:sts::<aws account id>:assumed-role/outboundCallRole/outboundCallFunc is not authorized to perform: connect:StartOutboundVoiceContact on resource: arn:aws:connect:ap-southeast-1:<aws account id>:instance/8e5bb349-23f0-478a-ac58-e09ba143ec3a/contact/*
If your AWS account is the management account, you can access Identity and Access Management (IAM) to manipulate roles and policies.
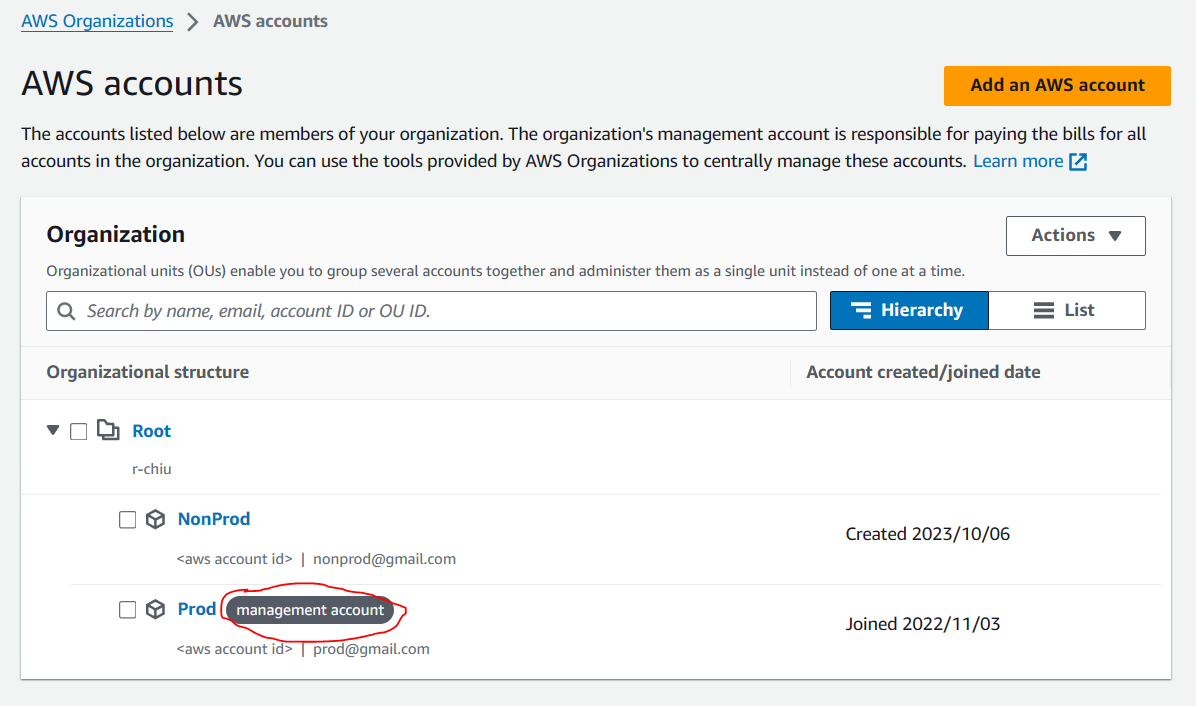
Note: If your account is managed by Control Tower, and you assure that be granted permission, you can also access IAM to manipulate roles and policies.
You can visit the URL and refer to how to grant IAM permissions for the assumed role outboundCallRole to perform Connect outbound calls.
III. AWS Lambda Functions with AWS CLI
The AWS CLI, short for AWS Command Line Interface tool, assists in configuring AWS credentials locally and executing actions such as creating Lambda functions. Accessing the AWS portal hinges on several factors, including your organization's setup, permissions, and the overall AWS environment configuration.
Typically, when you receive permission sets and associated emails, it signifies that you've been granted permissions as an IAM (Identity and Access Management) user. This allows you to interact with the AWS resources and services available to you within your organization's account.
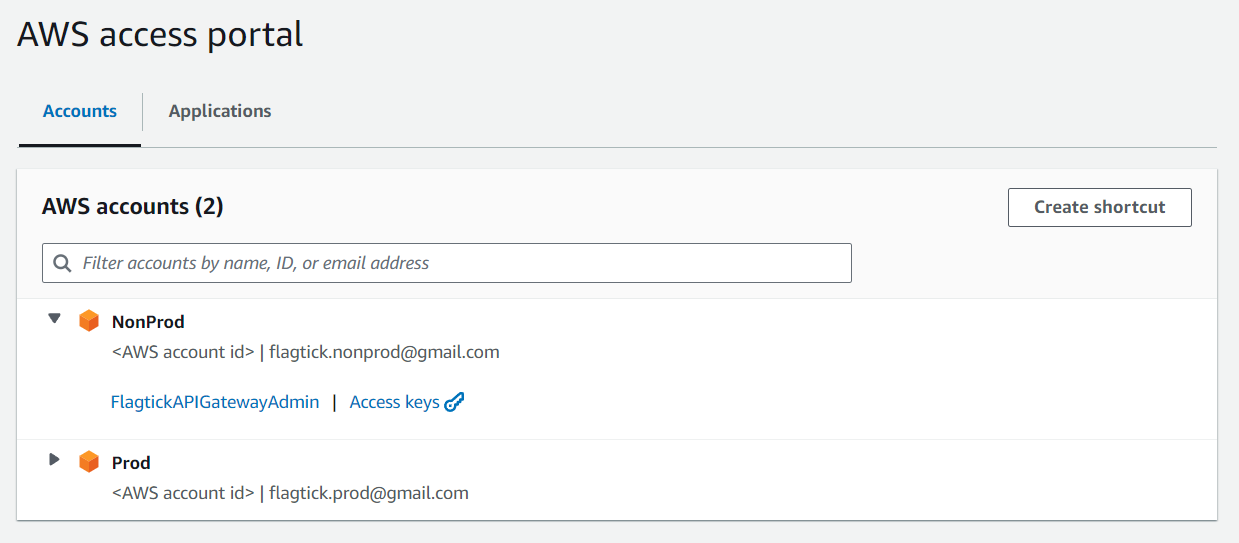
Upon clicking Access keys, you can obtain credentials for the FlagtickAPIGatewayAdmin role to access Flagtick's organization within the AWS Account through AWS CLI tool. There are three parameters to consider, as stated below:
SET AWS_ACCESS_KEY_ID=<Access Key>
SET AWS_SECRET_ACCESS_KEY=<Secret Key>
SET AWS_SESSION_TOKEN=<Session Token>
Note: If you aware the AWS_SESSION_TOKEN, it means your account has Multi-Factor Authentication (MFA) set up. This token has a limited lifespan and adds an extra layer of security to prevent unauthorized access.
Next, let us download and install the AWS CLI locally. You can do this by following the link provided here. After successfully installing it, run the following command to verify if it is ready:
aws --version
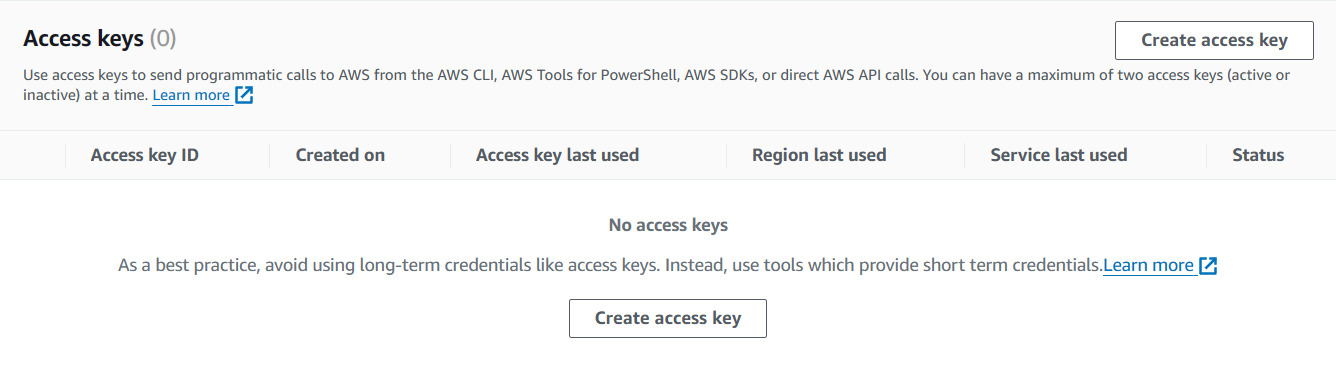
When not associated with an organization providing AWS credentials, create your own profile in your AWS account. Then, navigate to the IAM Management Portal and proceed to Security credentials » Access keys to generate your access key for AWS CLI usage.
Now, return to your terminal and execute the following command:
aws configure
Visit this link to access detailed information about any AWS Command Line Interface (CLI) command, including its usage, available options, parameters, and examples. For instance, you can find documentation for commands like `list-functions`.
aws lambda list-functions --region ap-southeast-1
As mentioned earlier, if you want to create the `outboundCallRole` to grant Lambda permission to execute the startOutboundVoiceContact action with AWS Connect service, here is an example policy:
» policy.json
{
	"Version": "2012-10-17",
	"Statement": [
		{
			"Sid": "Statement2",
			"Effect": "Allow",
			"Action": [
				"connect:StartOutboundVoiceContact"
			],
			"Resource": "arn:aws:lambda:ap-southeast-1:<AWS Account ID>:function:outboundCallFunc"
		}
	]
}
Run the following command to create the role using the policy defined above:
aws iam create-role --role-name outboundCallRole --assume-role-policy-document C:/Users/admin/Documents/policy.json
Overall, the folder structure appears to contain files related to AWS IAM policies and Node.js application code.
C:\Users\admin\Documents
├── policy.json
├── index.js
└── MFA.js
Next, zip and deploy the files `index.js` and `MFA.js` to Lambda function named outboundCallFunc using Node.js 16 runtime with the AWS CLI.
zip -r function.zip index.js MFA.js
aws lambda create-function \
--function-name outboundCallFunc \
--runtime nodejs16.x \
--handler index.handler \
--zip-file C:/Users/admin/Documents/function.zip \
--role arn:aws:iam::<AWS Account ID>:role/outboundCallRole
Updating your Lambda function's source code requires updating both the `index.js` and `MFA.js` files. Use the following command for successful update:
zip -r function.zip index.js MFA.js
aws lambda update-function-code \
--function-name basic-lambda-func \
--zip-file C:/Users/admin/Documents/function.zip
IV. OTP Authentication using Cognito Custom Flow
In the `MFA.js` file, the optCodeStr variable could offer insight into a practical scenario. Usually, after users sign up using Cognito, we can enable the Calling feature alongside SMS and Authenticator App to send OTP codes to users.
To begin, use the `amazon-cognito-identity-js` package to set up client application using Vue.js or React.js. This will allow you to create a sample application and apply Cognito custom flow authentication.
npm i amazon-cognito-identity-js
Import AuthenticationDetails, CognitoUser, and CognitoUserPool from `amazon-cognito-identity-js`.
import { AuthenticationDetails, CognitoUser, CognitoUserPool } from 'amazon-cognito-identity-js';
Before authenticating users, ensure you have set up Cognito User Pool by providing the User Pool ID and the Client ID.
const poolData = {
    UserPoolId: 'your_user_pool_id',
    ClientId: 'your_client_id'
};

const userPool = new CognitoUserPool(poolData);
Use the CognitoUser constructor to instantiate user object.
const userData = {
    Username: 'username',
    Pool: userPool
};

const cognitoUser = new CognitoUser(userData);
Before authenticating the user, you may need to set the authentication flow type. This is typically used for advanced scenarios such as custom authentication flows.
cognitoUser.setAuthenticationFlowType('CUSTOM_AUTH');
Lastly, authenticate the user by providing their username and password. Furthermore, include the verify challenge step during the authentication process.
const authenticationDetails = new AuthenticationDetails({
    Username: 'username',
    Password: 'password'
});

cognitoUser.setAuthenticationFlowType('CUSTOM_AUTH');
cognitoUser.authenticateUser(authenticationDetails, {
    onSuccess(result) {
       // TODO
    },
    customChallenge: (challengeParameters) => {
       // TODO
    },
    onFailure(err: AWS.AWSError) {
       // TODO
    },
});

cognitoUser.sendCustomChallengeAnswer(challengeAnswer, {
    onSuccess: (result) => {
        // TODO
    },
    onFailure: (err) => {
        // TODO
    }
});
Access Amazon Cognito in the AWS Management Console, then proceed to User Pool properties. From there, select Add Lambda trigger and choose Custom authentication as the Trigger type.

Upon choosing Custom authentication, proceed to create defineAuthChallenge, createAuthChallenge, and verifyAuthChallenge Lambda functions to link them to triggers from Cognito.
» defineAuthChallenge
exports.handler = async (event, context) => {

  if (
      event.request.session &&
      event.request.session.length === 1 &&
      event.request.session[0].challengeName === 'SRP_A' &&
      event.request.session[0].challengeResult === true
    ) {
      event.response.issueTokens = false;
      event.response.failAuthentication = false;
      event.response.challengeName = 'PASSWORD_VERIFIER';
    } else if (
      event.request.session &&
      event.request.session.length === 2 &&
      event.request.session[1].challengeName === 'PASSWORD_VERIFIER' &&
      event.request.session[1].challengeResult === true
    ) {
      event.response.issueTokens = false;
      event.response.failAuthentication = false;
      event.response.challengeName = 'CUSTOM_CHALLENGE';
    } else if (
      event.request.session &&
      event.request.session.length >= 5 &&
      event.request.session.slice(-1)[0].challengeName === 'CUSTOM_CHALLENGE' &&
      event.request.session.slice(-1)[0].challengeResult === false
    ) {
      // User has made three unsuccessful attempts to enter the correct OTP
      event.response.issueTokens = false;
      event.response.failAuthentication = true;
    } else if (
      event.request.session &&
      event.request.session.length > 0 &&
      event.request.session.slice(-1)[0].challengeName === 'CUSTOM_CHALLENGE' &&
      event.request.session.slice(-1)[0].challengeResult === true
    ) {
      // User has successfully entered the correct OTP
      event.response.issueTokens = true;
      event.response.failAuthentication = false;
    } else {
      // User has not provided a correct answer yet
      event.response.issueTokens = false;
      event.response.failAuthentication = false;
      event.response.challengeName = 'CUSTOM_CHALLENGE';
    }
    return event;
};
There are some important points to note:
- The initial challenge is SRP_A, which will be handled by Cognito. Then, set the next challenge as PASSWORD_VERIFIER.
- In reviewing the conditions, we have identified two for `event.request.session.length`: == 2 and >= 5. Simplifying the expression (>= 5) - (==2) = (>=3) suggests that the user has attempted to enter the correct OTP unsuccessfully more than 3 times.
- Before calling the custom flow, it is important to verify that Cognito has disabled the MFA option so that the condition in define Auth Challenge can function accurately.
» createAuthChallenge
index.js
const crypto = require('crypto');
const { outboundVoiceFunc } = require('./MFA.js');

exports.handler = async (event) => {
  let otpCode = '';
  let phoneNumber = event.request.userAttributes['custom:YourPhone'];

  try {
    if (event.request.session.length === 2) {
      optCode = crypto.randomInt(100000, 999999).toString();

      await startOutboundVoiceContact({
        phoneNumber: `${phoneNumber}`,
        contactFlowId: '<contact flow id>',
        optCode: optCode,
      });
    } else {
      // If an error occurs or the user makes a mistake, the system allows for a seamless retry using the previous verification code
      const previousChallenge = event.request.session.slice(-1)[0];
      optCode = previousChallenge.challengeMetadata ?? '';
    }

    const expireAt = Date.now() + (15*60_000);
    event.response.privateChallengeParameters = {
      optCode,
      expireAt: expireAt.toString(),
    };
    event.response.challengeMetadata = optCode;
  } catch (error) {
    event.response.issueTokens = false;
    event.response.failAuthentication = true;
  }
  return event;
};

MFA.js
const AWS = require('aws-sdk');
AWS.config.update({ region: process.env.region });
const connect = new AWS.Connect();
async function outboundVoiceFunc({ phoneNumber, optCode, contactFlowId }) {
  try {
    const otpCodeStr = otpCode.toString().split('').join(' ');
    const connectParams = {
      DestinationPhoneNumber: phoneNumber,
      ContactFlowId: contactFlowId,
      InstanceId: '<instance id>',
      SourcePhoneNumber: '<source phone>',
      Attributes: { 'VoiceMFA': otpCodeStr }
    };
    return await connect.startOutboundVoiceContact(connectParams).promise();
  } catch (error) {
    throw error;
  }
}
module.exports = { outboundVoiceFunc };
» verifyAuthChallenge
exports.handler = async (event) => {

  const expireAt = event.request.privateChallengeParameters['expireAt'];
  if (expireAt) {
    if (Date.now() > +expireAt) {
      event.response.answerCorrect = false;
      return event;
    }
  }
  const expectedAnswer = event.request.privateChallengeParameters['optCode'];
  event.response.answerCorrect = event.request.challengeAnswer === expectedAnswer;
  return event;
};
V. Conclusion
This article aims to demonstrate how AWS Connect associates with AWS Cognito to enhance support for SMS, Authenticator App, and Phone Call functionalities. It begins with an overview of AWS Connect as a call solution and concludes with a practical application utilizing the calling feature within Cognition's Custom Flow. If you have any questions or need further assistance regarding the content, please feel free to leave a comment for support.
VI. Video