First and foremost, comprehend the Digital Experience Platform, especially within the context of AEM (Adobe Experience Manager). This platform allows you to leverage its capabilities to create a modern website with full features and high customization. In this article, however, we won't delve into the specific details of utilizing REST APIs and establishing interactions between the AEM site and AWS Cloud.
I. Implement Front-end Module Logic
Assume you are using Typescript in your Front-end module to handle the logic of calling REST API created by Sling Servlet within the AEM site. We will represent the page as an XML file, as shown below:
» http://localhost:4502/content/flagtick/us/en/sample.html.-1.json
{
  "jcr:primaryType": "cq:Page",
  "jcr:content": {
    "jcr:primaryType": "cq:PageContent",
    "jcr:mixinTypes": [
      "mix:versionable"
    ],
    "jcr:createdBy": "admin",
    "jcr:title": "Sample Page",
    ...
    "cq:template": "/conf/flagtick/settings/wcm/templates/sample-template",
    ...
    "root": {
      "jcr:primaryType": "nt:unstructured",
      "layout": "responsiveGrid",
      "sling:resourceType": "flagtick/components/content/container",
      "container": {
        "jcr:primaryType": "nt:unstructured",
        "layout": "responsiveGrid",
        "sling:resourceType": "flagtick/components/content/container",
        "container": {
          "jcr:primaryType": "nt:unstructured",
          "layout": "responsiveGrid",
          "sling:resourceType": "flagtick/components/content/container",
          "sample": {
            "jcr:primaryType": "nt:unstructured",
            "jcr:title": "Sample",
            ...
            "sling:resourceType": "flagtick/components/content/sample",
            ...
          }
        }
      }
    }
  }
}
Note: Instead of using `-1.json`, you can also use `infinity.json` to load the structure as demonstrated above.
Analyzing the structure briefly, let attention to attaching AEM component named `Sample` upon using `sling:resourcePath` for declaration: `flagtick/components/content/sample`. Now, let us proceed to write sample logic in the `Sample.ts` file to call an API from Typescript within the context of AEM.
» flagtick/components/content/sample
data-cmp-is="Sample"
» Sample.ts
await $.ajax({
	url: endpoint,
	type: 'GET',
	headers: { sample: <your value> },
	success: (data: SampleResponse): boolean => {
	  // TODO
	},
	error: (err): void => {
	  // TODO
	},
  });
Note: In reality, $.get serves as a shorthand or an abbreviated form of $.ajax, catering to specific cases. Therefore, it's advisable to consider the most suitable approach for each particular scenario. For instance:
await $.get(endpoint)
	.done((data: SampleResponse): boolean => {
	  // TODO
	})
	.catch((err): void => {
	  // TODO
  });
Observing the first approach, we want to add parameter into the request header to transmit it to the Back-end, facilitating its processing within the Sling Servlet. The endpoint will be unknown parameter that needs be declared to appropriately map with the Sling servlet in the AEM back-end. What syntax should be used in this context?
<resource-path> <selector> <.json> <...parameters>
The resource-path is identified as 'sling:resourcePath,' as previously mentioned. The selector serves as the specific prefix you established to differentiate it from other endpoints when your script file accesses multiple endpoints.
» Sample.ts
private selector = 'sample';
...
const endpoint = `${resource}.${this.selector}.json?xparam=${value1}&yparam=${value2}`;
The resource can be acquired from a data attribute within HTML, but to ensure proper functionality, the `data-resource` should be positioned after the `data-cmp-is` attribute.
» sample.html
<sly data-sly-use.templates="core/wcm/components/commons/v1/templates.html"
     data-sly-use.model="com.flagtick.core.models.SampleModel">
    <div class="flagtick-sample"
         data-cmp-is="Sample"
         data-resource="${resource.path}"
...
» Sample.ts
private $component;

constructor(cmp: HTMLElement) {
  super(cmp);
  ...
  this.$component = $(cmp);
}

...
const resource = this.$component.data('resource') as string;
II. Configuring Dispatcher Rules for Specific Content Types
In the Dispatcher layer, we have rules that ensure requests matching specified criteria are allowed to reach your Sling Servlet, providing a pathway for processing JSON requests through your servlet. This is a way of fine-tuning access control and ensuring that the servlet handles the intended requests.
» dispatcher/src/conf.dispatcher.d/filters/filters.any
/0201 { /type "allow" /extension "json" /selectors "sample" /path "/content/*" }
- Your Sling Servlet (SampleServlet.java) is designed to handle requests with the selector sample.json and the JSON extension (Constants.EXTENSION_JSON).
- The Dispatcher rule (/0201) aligns with this servlet by allowing requests with the selector sample.json, the JSON extension, and within the /content/ path.
If you don't configure rules to allow requests to reach SampleServlet.java, pages using that request may not be able to load the data, and it could result in a 404 error page or other similar issues. The rules in the Dispatcher layer act as a filter, determining which requests are allowed to pass through to your servlet and be processed.
In further information, we don't want to be able to cache the request in the dispatcher; hence, we use rules as below in the rules.any file, to deny caching.
» dispatcher/src/conf.dispatcher.d/cache/rules.any
/0021 {
    /glob "*.sample.json"
    /type "deny"
}
There are additional configurations that can be advanced in the dispatcher. We will discuss and resolve specific circumstances as needed.
III. Craft AEM Servlet for Component REST Call
Start by learning a bit about Java and the Sling framework, which AEM uses for its back-end. Then, create a simple Servlet to handle incoming request data from the Sample component.
» SampleServlet.java
package com.flagtick.core.servlets;
...

@Component(immediate = true, service = Servlet.class,
        property = {
                SERVICE_DESCRIPTION + SampleServlet.SERVLET_SERVICE_DESCRIPTION,
                SLING_SERVLET_RESOURCE_TYPES + SampleServlet.RESOURCE_TYPE,
                SLING_SERVLET_METHODS + "=" + HttpConstants.METHOD_GET,
                SLING_SERVLET_SELECTORS + SampleServlet.SELECTOR,
                SLING_SERVLET_EXTENSIONS + "=" + Constants.EXTENSION_JSON
        })
public class SampleServlet extends SlingSafeMethodsServlet {

    public static final String SERVLET_SERVICE_DESCRIPTION = "=FLAGTICK - The Innovative Blog for Programmers";
    public static final String RESOURCE_TYPE = "=flagtick/components/content/sample";
    public static final String SELECTOR = "=sample";

    private static final long serialVersionUID = 1L;
	// TODO
}
In Java, @Reference is an annotation typically used in the context of OSGi (Open Service Gateway Initiative) or dependency injection frameworks such as Apache Felix or Apache Sling, commonly utilized in the development of applications on platforms like Adobe Experience Manager (AEM).
@Reference
transient private RdsFlagtickService rdsFlagtickService;
We can define the doGet method to receive the request payload and then proceed to configure the implementation specific to the rdsFlagtickService method.
» SampleServlet.java
@Override
protected void doGet(SlingHttpServletRequest request, SlingHttpServletResponse response) throws IOException {

	if (rdsFlagtickService == null) {
		response.setStatus(HTTP_UNAVAILABLE);
		response.getWriter().write("Service unavailable");
		return;
	}

	response.setContentType(Constants.CONTENT_TYPE_JSON);
	response.setCharacterEncoding(Constants.ENCODING_UTF8);
	response.setStatus(HTTP_OK);

	String sample = request.getHeader(Constants.SAMPLE); // sample
	Map<String, String> params = new HashMap<>();
	params.put(Constants.XPARAM, request.getParameter(Constants.XPARAM));
	params.put(Constants.YPARAM, request.getParameter(Constants.YPARAM));
	PojoJavaModel pojoJavaModel = rdsFlagtickService.verifyPojo(params, sample);

	// if requested parameters don't exist or an invalid combination was requested
	if (pojoJavaModel == null) {
		response.setStatus(HTTP_BAD_REQUEST);
		response.getWriter().write("Invalid request parameters");
		return;
	}

	ObjectMapper objectMapper = new ObjectMapper();
	objectMapper.writeValue(response.getWriter(), pojoJavaModel);
}
By using the Adapter pattern, you are essentially creating a bridge between the expected interface (RdsFlagtickService.java) and the actual implementation (RdsFlagtickServiceImpl.java). This allows the RdsFlagtickServiceImpl.java class to adapt and implement the methods defined in the RdsFlagtickService interface, ensuring they can be used interchangeably.
IV. Applying Adapter Pattern in AEM Servlet
The Adapter pattern enables integration between classes with incompatible interfaces. Thus, we will create sample logic for the `verifyPojo` method.
» RdsFlagtickService.java
public interface RdsFlagtickService {
	PojoJavaModel verifyPojo(Map<String, String> paramMap, String sample);
}
» RdsFlagtickServiceImpl.java
@Component(
        immediate = true,
        service = RdsFlagtickService.class
)
@Designate(ocd = RdsFlagtickServiceImpl.Config.class)
public class RdsFlagtickServiceImpl implements RdsFlagtickService {
	@Override
    public PojoJavaModel verifyPojo(Map<String, String> paramMap, String sample) {
		PojoJavaModel pojoJavaModel = new PojoJavaModel();
        URI uri;

        try {
            uri = buildParameterizedUri(verifyPojoEndpoint, paramMap);
        } catch (URISyntaxException e) {
            LOGGER.error(UNABLE_TO_CREATE_URI, e);
            return null;
        }

        HttpGet request = createNonAuthenticatedGetRequest(apiKey, uri, sample);
        try (CloseableHttpClient httpClient = HttpClients.createDefault();
             CloseableHttpResponse response = httpClient.execute(request)) {

            if (response.getStatusLine().getStatusCode() == HTTP_BAD_REQUEST) {
                LOGGER.error(BAD_REQUEST_ERROR_MSG);
                return null;
            }
            HttpEntity entity = response.getEntity();
            if (entity != null) {
                String responseData = EntityUtils.toString(entity, StandardCharsets.UTF_8);
                ObjectMapper objectMapper = new ObjectMapper();
                SimpleModule module = new SimpleModule();
                module.addDeserializer(PojoJavaModel.class, new PojoJavaModelDeserializer());
                objectMapper.registerModule(module);
                pojoJavaModel = objectMapper.readValue(responseData, PojoJavaModel.class);
            }
        } catch (ClientProtocolException e) {
            LOGGER.error(CLIENT_PROTOCOL_EXCEPTION, e);
        } catch (IOException e) {
            LOGGER.error(ERROR_WHILE_PARSING_THE_RESPONSE, e);
        }
        return pojoJavaModel;
	}
}
In here, we will focus on the definition of the `verifyPojoEndpoint`. Specifically, this definition is established based on OSGi configuration in AEM using the `@AttributeDefinition`.
» RdsFlagtickServiceImpl.java
@ObjectClassDefinition(
		name = "FLAGTICK - The Innovative Blog for Programmers",
		description = "RDS Flagtick Service Configurations"
)
protected @interface Config {

	@AttributeDefinition(
			name = "Verify Pojo Endpoint",
			description = "URL endpoint for verify Pojo",
			type = AttributeType.STRING
	)
	String verifyPojoEndpoint();

	@AttributeDefinition(
			name = "API key",
			description = "API key for API Gateway",
			type = AttributeType.STRING
	)
	String apiKey();
}
Use the script as below for dynamically building URIs with parameters in a more systematic and efficient way, especially when working with RESTful APIs or any system requiring parameterized URIs.
» RdsFlagtickServiceImpl.java
private URI buildParameterizedUri(String endpoint, Map<String, String> paramMap) throws URISyntaxException {
    List<NameValuePair> list = new ArrayList<NameValuePair>();
    paramMap.entrySet()
            .forEach(entry -> list.add(
                    new BasicNameValuePair(entry.getKey(), entry.getValue()
                    )));

    URI uri = new URIBuilder(endpoint)
            .addParameters(list)
            .build();

    return uri;
}
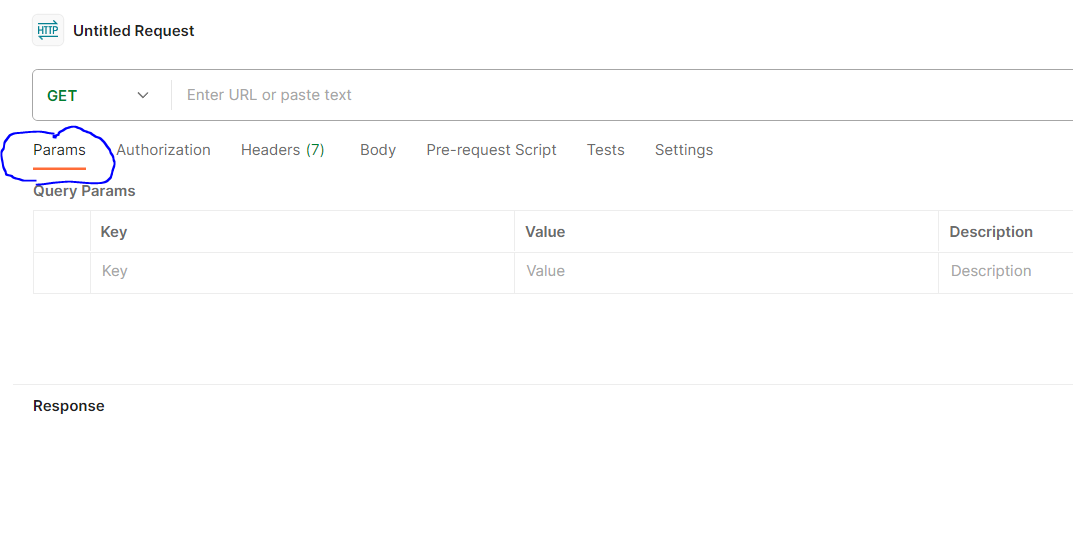
If we follow this approach, when practicing on Postman, you should pay attention to the red circle in the indicated area, as shown in the screenshot below:
The following section focuses on the `createNonAuthenticatedGetRequest` method, which involves adding default or custom parameters to the request before sending it to the AWS API Gateway.
» RdsFlagtickServiceImpl.java
private HttpGet createNonAuthenticatedGetRequest(String apiKey, URI uri, String poolid) {
    HttpGet request = new HttpGet(uri);
    request.addHeader(Constants.HEADER_CONTENT_TYPE, Constants.CONTENT_TYPE_JSON);
    request.addHeader(Constants.X_API_KEY, apiKey);
    request.setHeader(Constants.SAMPLE, sample);
    return request;
}
It will be quite similar to the Postman request as above, where you can add a custom parameter named sample within the header tab.
V. Configure Dispatcher On AEM Publish Instance
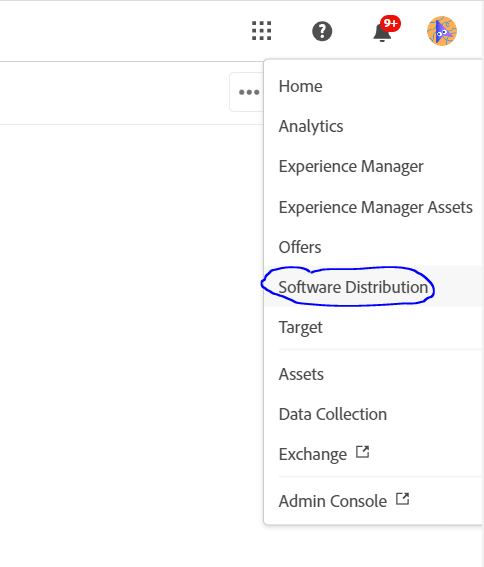
Before configuring the dispatcher for AEM, you will need to download the package from Adobe Cloud. To do so, you must have been granted permission to access the Adobe Cloud. Once you have permission, you can download the package from the Software Distribution tab on the Adobe Experience Cloud website.
The AEM as a Cloud Service SDK also includes the Dispatcher Tools version that facilitates configuring, validating, and simulating Dispatcher locally for development.

Using `aem-sdk-dispatcher-tools-2.0.113-windows.zip` file, extract all and copy all files and folders inside it to a new folder named `dispatcher`.
 +-- dispatcher
     +-- bin
     +-- docs
     +-- lib
     +-- src
     +-- README
Go to the folder `bin` and execute the command below by opening the command prompt tool:
» cmd
C:\aem-sdk\author\dispatcher>bin\validate src
opt-in USE_SOURCES_DIRECTLY marker file detected
Phase 1: Dispatcher validator
Cloud manager validator 2.0.43

2023/11/09 00:18:18 C:\aem-sdk\author\dispatcher\src\conf.d\enabled_vhosts\default.vhost: is an empty file, expected a (pseudo) symlink

2023/11/09 00:18:18 Dispatcher configuration validation failed:
  C:\aem-sdk\author\dispatcher\src\conf.dispatcher.d\enabled_farms\default.farm: is an empty file, expected a (pseudo) symlink

2023/11/09 00:18:18 skipping symlinks resolution checks for global folder due to windows platform

2023/11/09 00:18:18 please use a Linux/OS X environment to run locally or check results with a Cloud Manager pipeline
Phase 1 failed
Note: Use the provided scripts to resolve the symlink error
» Apple macOS, Linux and WSL
ln -s ../available_vhosts/default.vhost default.vhost
» Microsoft Windows
mklink default.vhost ..\available_vhosts\default.vhost
Here are step-by-step instructions to convert a regular file to a symlink.
C:\>cd C:\aem-sdk\author\dispatcher\src\conf.d\enabled_vhosts

C:\aem-sdk\author\dispatcher\src\conf.d\enabled_vhosts>del default.vhost
C:\aem-sdk\author\dispatcher\src\conf.d\enabled_vhosts>del flagtick.vhost

C:\aem-sdk\author\dispatcher\src\conf.d\enabled_vhosts>mklink default.vhost ..\available_vhosts\default.vhost
symbolic link created for default.vhost <<===>> ..\available_vhosts\default.vhost

C:\aem-sdk\author\dispatcher\src\conf.d\enabled_vhosts>mklink flagtick.vhost ..\available_vhosts\flagtick.vhost
symbolic link created for flagtick.vhost <<===>> ..\available_vhosts\flagtick.vhost

C:\aem-sdk\author\dispatcher\src\conf.d\enabled_vhosts>cd C:\aem-sdk\dispatcher\src\conf.dispatcher.d\enabled_farms
C:\aem-sdk\author\dispatcher\src\conf.dispatcher.d\enabled_farms>del default.farm

C:\aem-sdk\author\dispatcher\src\conf.dispatcher.d\enabled_farms>mklink default.farm ..\available_farms\default.farm
symbolic link created for default.farm <<===>> ..\available_farms\default.farm

C:\aem-sdk\author\dispatcher\src\conf.dispatcher.d\enabled_farms>cd C:\aem-sdk\dispatcher\

C:\aem-sdk\author\dispatcher>bin\validate src
opt-in USE_SOURCES_DIRECTLY marker file detected
Phase 1: Dispatcher validator
Cloud manager validator 2.0.43
2023/11/09 08:15:59 skipping symlinks resolution checks for global folder due to windows platform
2023/11/09 08:15:59 please use a Linux/OS X environment to run locally or check results with a Cloud Manager pipeline
2023/11/09 08:15:59 No issues found
Phase 1 finished
Phase 2: httpd -t validation in docker image
Phase 2 failed
Here is a link to the official Adobe Experience Manager documentation that describes how to configure the dispatcher. In AEM project, specifically within the `dispatcher/src/conf.d/available_vhosts` directory, the files `default.vhost` and `flagtick.vhost` likely represent different configurations for the Dispatcher module.
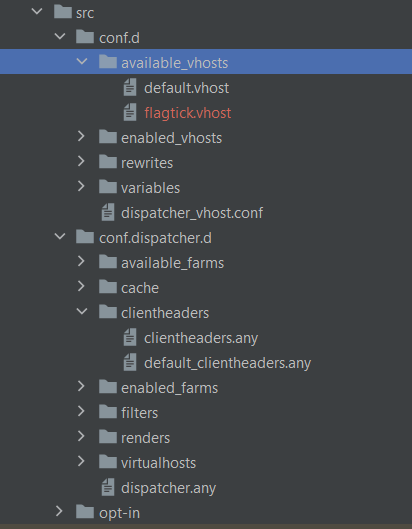
Hence, the `default.vhost` file within the `dispatcher/src/conf.d/available_vhosts` directory generally represents the default configuration for handling requests. This file is often part of the Dispatcher configuration setup.
Note: In practice, there is no need to replicate the entire structure of the AEM project's dispatcher module in the dispatcher tool folder. Focus on resolving issues related to symbolic links instead.
The next step is to install Docker. Please follow the link provided here to set up Docker on your machine. Once you have installed Docker, run the command below to test the version on your local machine.
» cmd
C:\Users\admin>docker --version
Docker version 20.10.23, build 7155243
Use the Docker container effectively with the AEM setup, having the AEM author instance running at localhost:4503 prior to executing the Docker setup might be necessary.
curl --verbose http://localhost:4503/content.html
Orchestrate Docker container for AEM, connecting the local AEM author instance on localhost:4503 to the Docker container, which may run on port 8080. It potentially syncs configurations or content from the specified src directory to set up the Docker environment.
» Step 1: Validate the Dispatcher configuration contained in this SDK
bin\validator full -d out src
You can open the Dispatcher folder in Visual Studio Code and review the script in the docker_immutability_check file to confirm whether the aem-ethos/dispatcher-publish image has already been established.
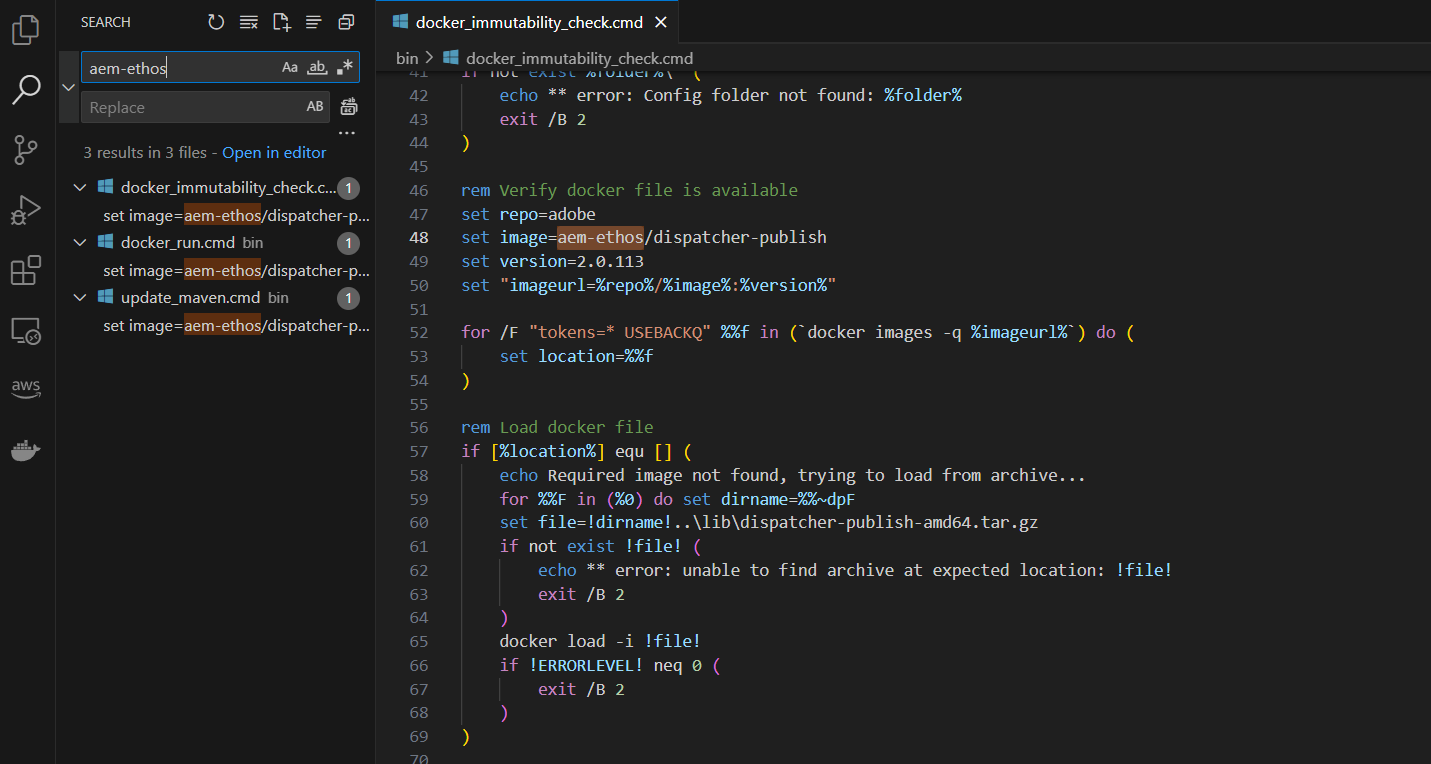
After that, you will need to execute the command bin\docker_immutability_check.cmd src to download and install the aem-ethos/dispatcher-publish image.
C:\aem-sdk\author\dispatcher>bin\docker_immutability_check.cmd src
empty mode param, assuming mode = 'check'
running in 'check' mode
Required image not found, trying to load from archive...
24302eb7d908: Loading layer [==================================================>]  5.811MB/5.811MB
099ce287de2f: Loading layer [==================================================>]   9.36MB/9.36MB
4c437311d24e: Loading layer [==================================================>]  1.831MB/1.831MB
3e3f845193cb: Loading layer [==================================================>]  797.2kB/797.2kB
bf0175df9ca5: Loading layer [==================================================>]  3.584kB/3.584kB
e16f39cb80e0: Loading layer [==================================================>]   5.12kB/5.12kB
3a11270720aa: Loading layer [==================================================>]  3.584kB/3.584kB
7c1f8baa5d08: Loading layer [==================================================>]  834.6kB/834.6kB
69287f02103f: Loading layer [==================================================>]  3.072kB/3.072kB
97ddc562a833: Loading layer [==================================================>]  7.168kB/7.168kB
61a5284c392e: Loading layer [==================================================>]  3.584kB/3.584kB
b61692b27ed9: Loading layer [==================================================>]  2.574MB/2.574MB
Loaded image: adobe/aem-ethos/dispatcher-publish:2.0.113
running in 'check' mode
...
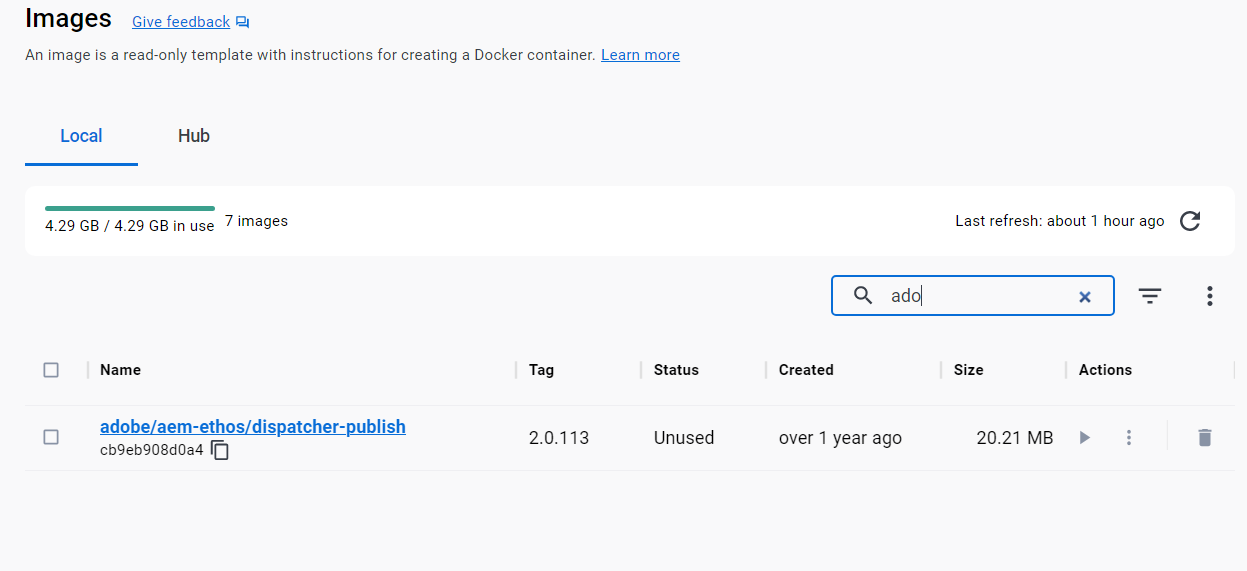
Next, you can verify the presence of the image using the Docker Desktop GUI.
» Step 2: Validate the deployment information by the Dispatcher in a docker image
bin\docker_run.cmd out host.docker.internal:4503 test
Using the `host.docker.internal:4503` means referring to your local machine's IPv4 address. You can verify this address by using the ipconfig command, which shows the specific network setup of your machine.
curl --verbose host.docker.internal:4503
* Trying 192.168.10.243:4503...
* Connected to host.docker.internal (192.168.10.243) port 4503 (#0)
> GET / HTTP/1.1
> Host: host.docker.internal:4503
> User-Agent: curl/8.0.1
> Accept: */*
>
< HTTP/1.1 302 Found
< Location: /index.html
< Transfer-Encoding: chunked
<
* Connection #0 to host host.docker.internal left intact
» Step 3: Confirm that no immutable config file was changed against a docker image ones
bin\docker_immutability_check.cmd src
» Step 4: Start the Dispatcher in a docker image with that deployment information
bin\docker_run.cmd out host.docker.internal:4503 8080
or using
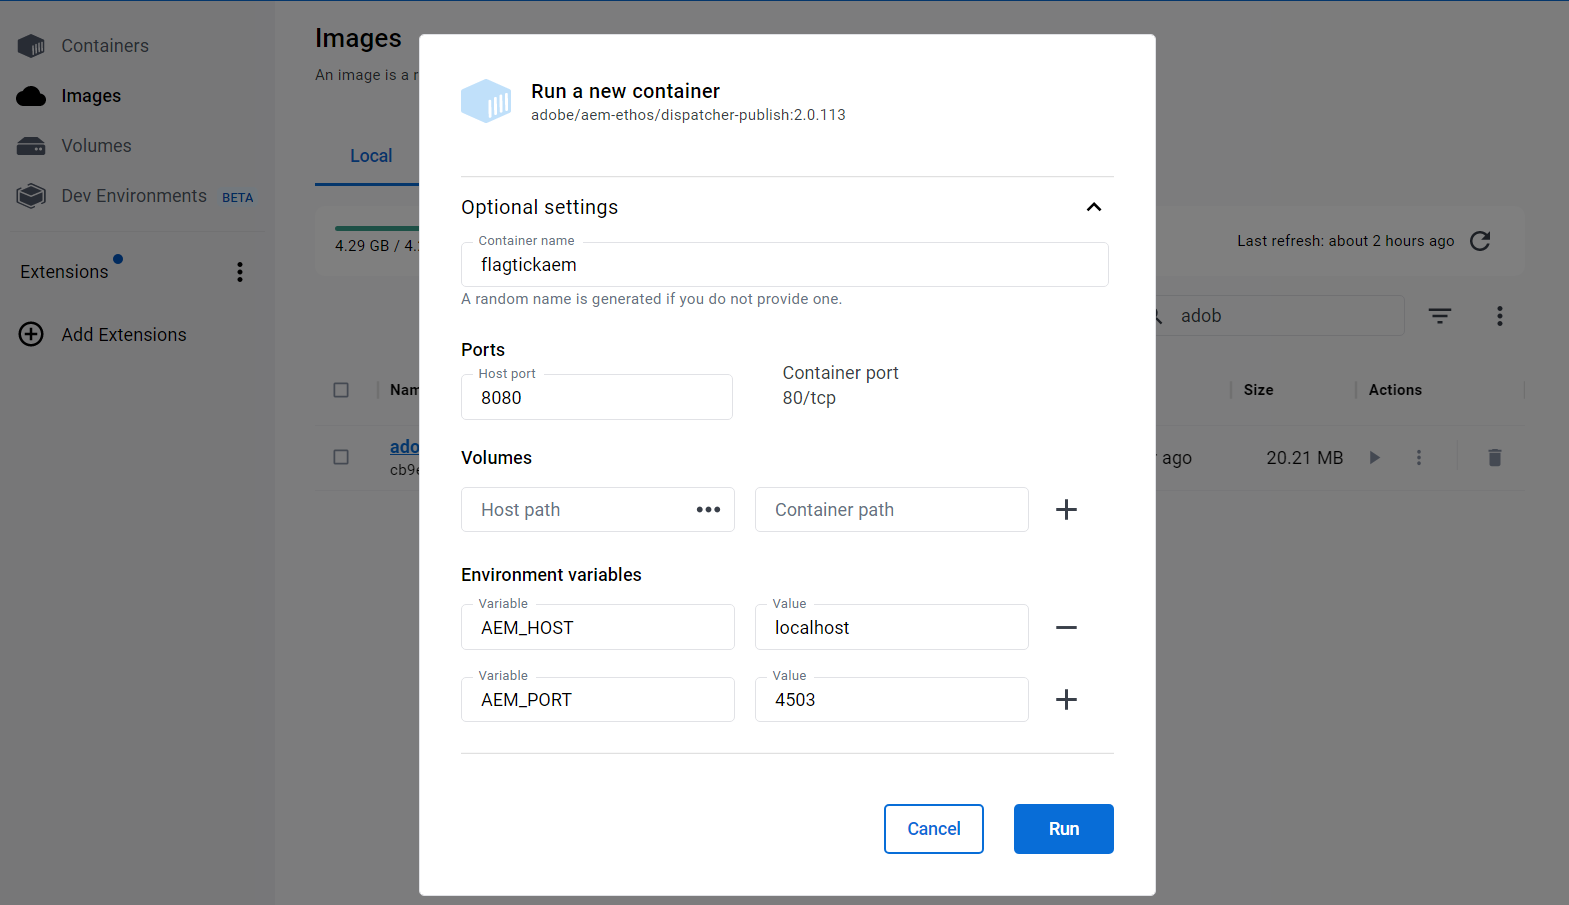
docker run -e AEM_HOST=localhost -e AEM_PORT=4503 -p 8080:80 <image_name>
In some cases, if you encounter issues with the command line, you can use the Docker App GUI as follows:
You may encounter issues with the dispatcher layer when publishing content to the publish instance. While authors might not face any problems, the publish instance might experience challenges related to the dispatcher layer. Good luck!
VI. Working with AWS API Gateway
After the request passes the dispatcher and directly reaches the AWS API Gateway, you also need to handle the addition of custom headers and parameters to ensure smooth functioning in the Lambda function. The Lambda function is the final destination where payload is received and resolved, often involving interactions with the database layer.
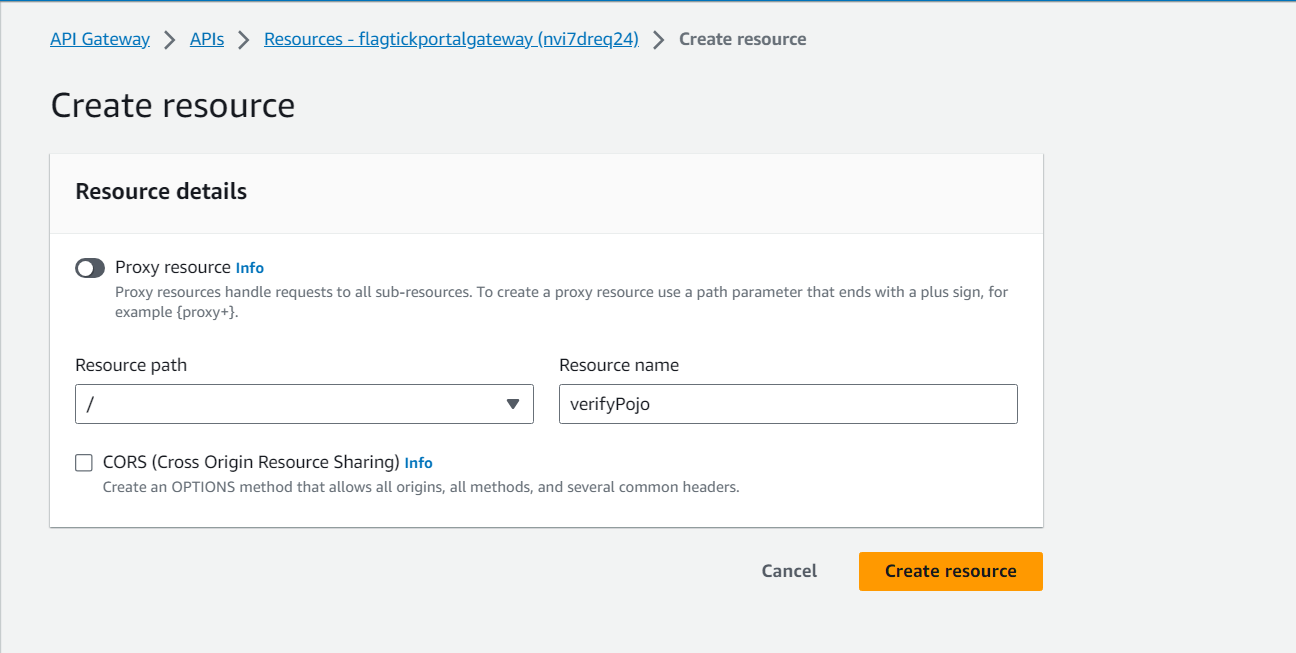
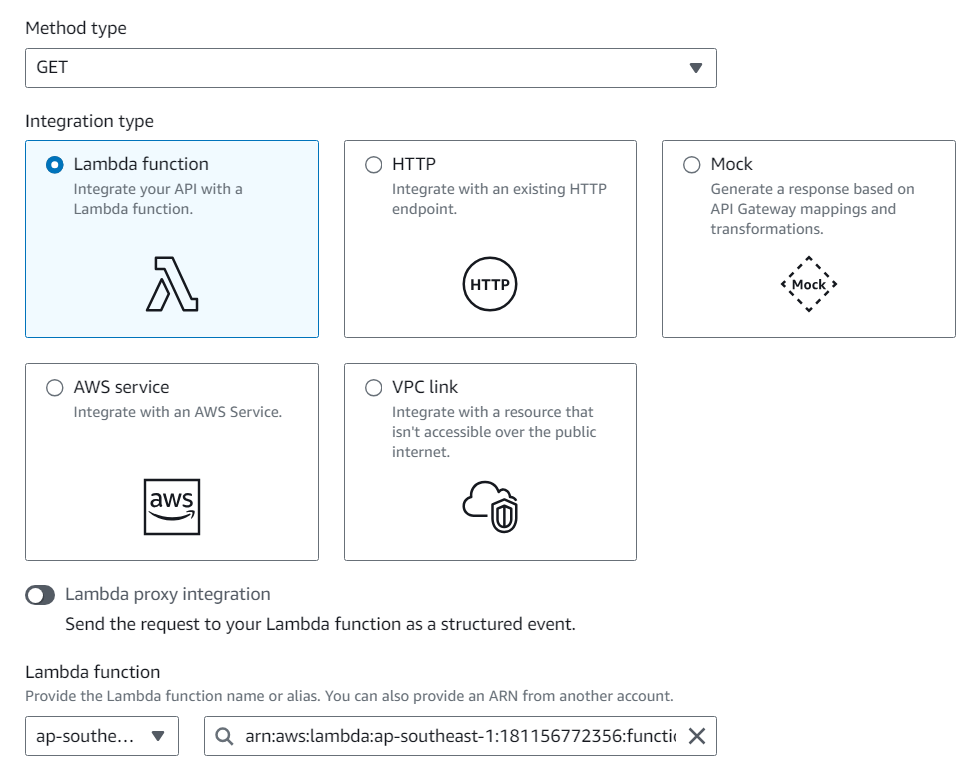
The next step is to define the method (e.g., GET) for the resource name, and specify which Lambda function to use. This is where you handle the logic for the API Gateway.
Note: When you're using an AWS Lambda function to access a database like RDS using a connection pool (e.g., pool.connect), having the Lambda function within a Virtual Private Cloud (VPC) becomes essential.
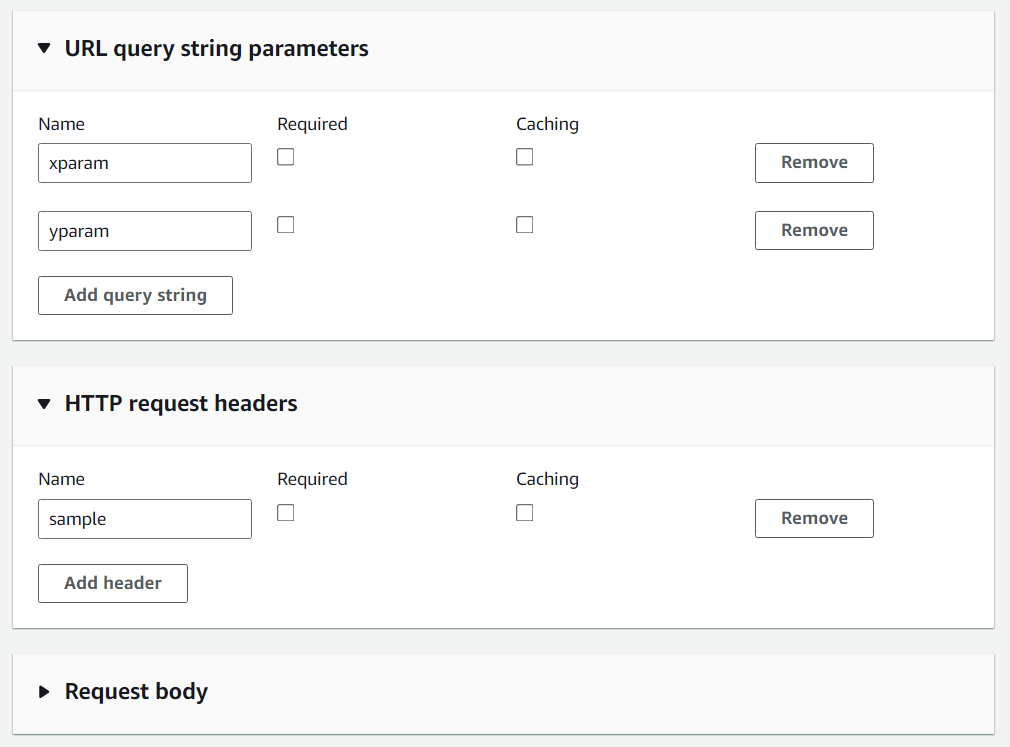
Configure the URL query string parameters and HTTP request headers in the API Gateway endpoint settings. This ensures that values provided in the request are correctly forwarded to the associated Lambda function for further processing at the final stage.
VII. Conclusion
In summary, the journey starts on the AEM site with TypeScript on the front-end. It then makes its way to the back-end through a Sling Servlet, passes through the Dispatcher, and reaches the AWS API Gateway. This article gives a broad perspective, and upcoming articles will delve into specific aspects of the AEM project for a deeper understanding.
VIII. Video